Xero Integration with Salesforce
April 12, 2024
After completing this unit, you’ll be able to:
- Introduction
- Authorize Salesforce org with Xero
- Create Contacts in Xero using API
- Get Contacts in Salesforce using API
Introduction:
The integration between Xero and Salesforce offers a multitude of benefits for businesses looking to streamline their operations and drive growth. By combining financial data with customer insights, businesses can gain a holistic view of their operations and make smarter decisions that drive success. Whether it's improving sales effectiveness, enhancing customer service, or automating workflows, the Xero-Salesforce integration is a game-changer for businesses of all sizes.
Authorize Salesforce org with Xero:
Create Auth. Provider:
1. Go to Setup and search Auth in the quick find box and select Auth. Providers.
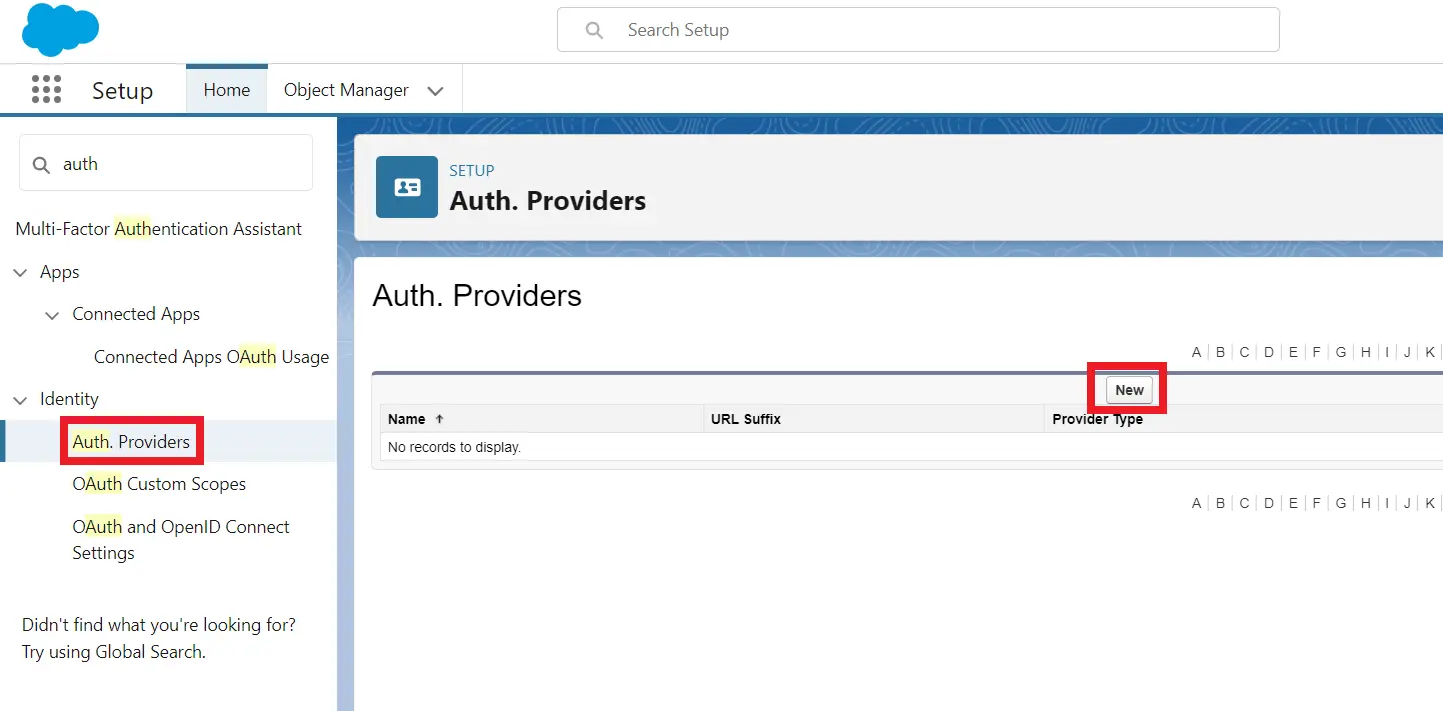
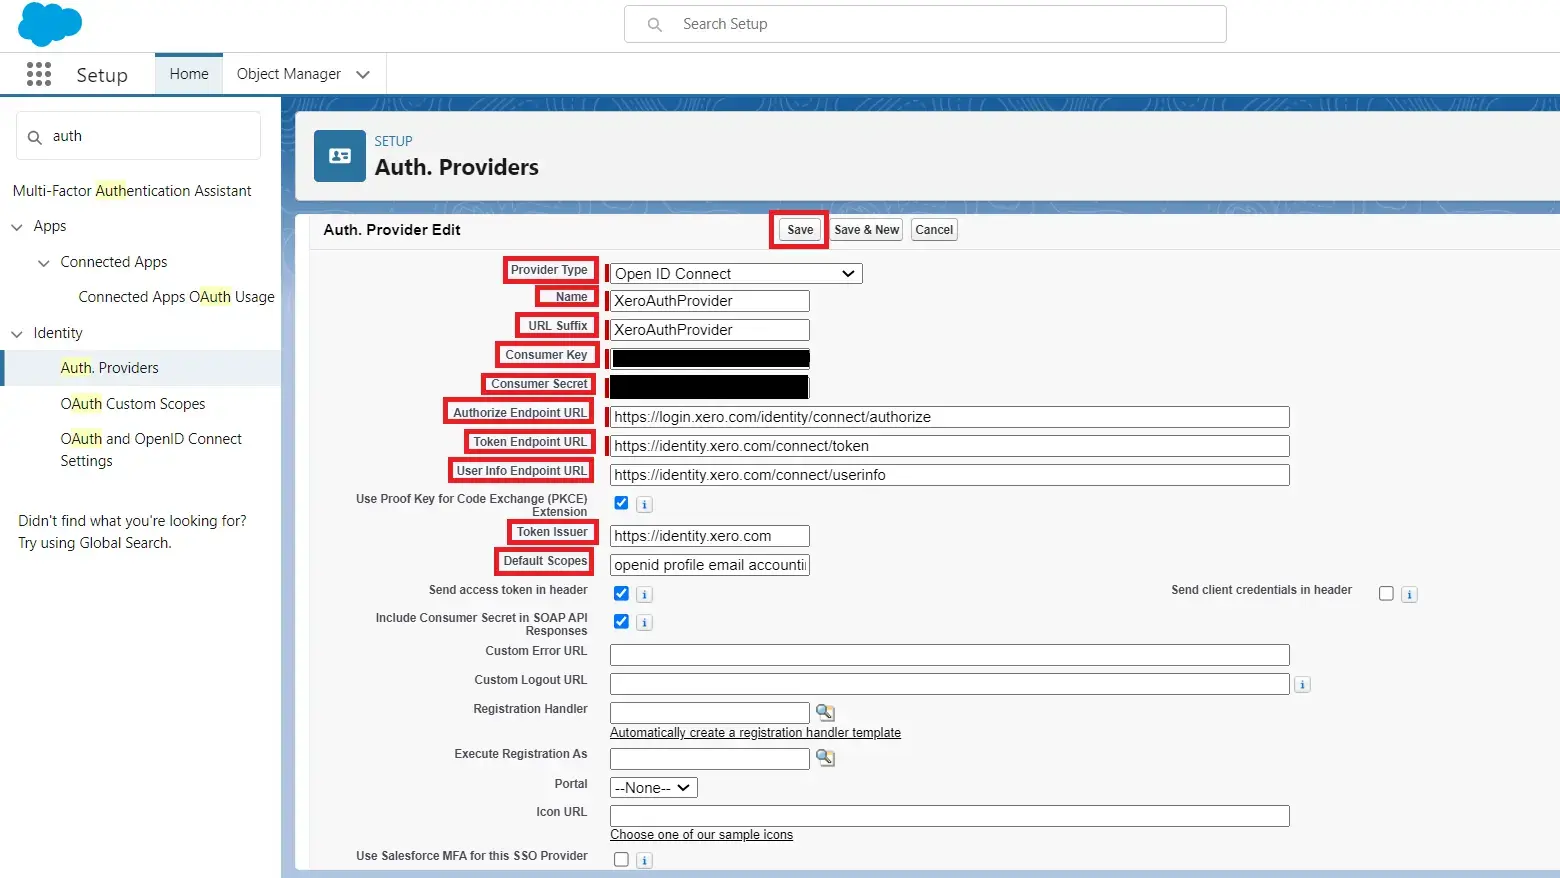
2. Click on New, and in Provider Type, select Open ID Connect.
3. Inside the Name and URL Suffix, enter XeroAuthProvider.
4. For the Consumer Key and Consumer Secret, enter developer.xero.com in the new browser tab and login. Now, inside the My Apps tab, click on New App and fill in these fields:
| App name | SalesforceConnect |
| Integration type | Web app |
| Company or application URL | https://nandblogs.com/ |
| Redirect URI | https://nandblogs.com/ |
Click on Create App.
Click on the My Apps tab > SalesforceConnect app, and in Configuration, copy the Client id and paste it into the Consumer Key field. Then, click on Generate a secret, copy Client secret 1, and paste it into the Consumer Secret field.
5. In the Authorize Endpoint URL, enter https://login.xero.com/identity/connect/authorize.
6. In the Token Endpoint URL, enter https://identity.xero.com/connect/token.
7. In the User Info Endpoint URL, enter https://identity.xero.com/connect/userinfo.
8. In Token Issuer, enter https://identity.xero.com.
9. In Default Scopes, enter openid profile email accounting.transactions.
10. Click Save.
Create Named Credentials:
1. Go to Setup and search Named in the quick find box, then select Named Credentials.
2. In the Named Credentials tab, click on the down arrow and select New Legacy.
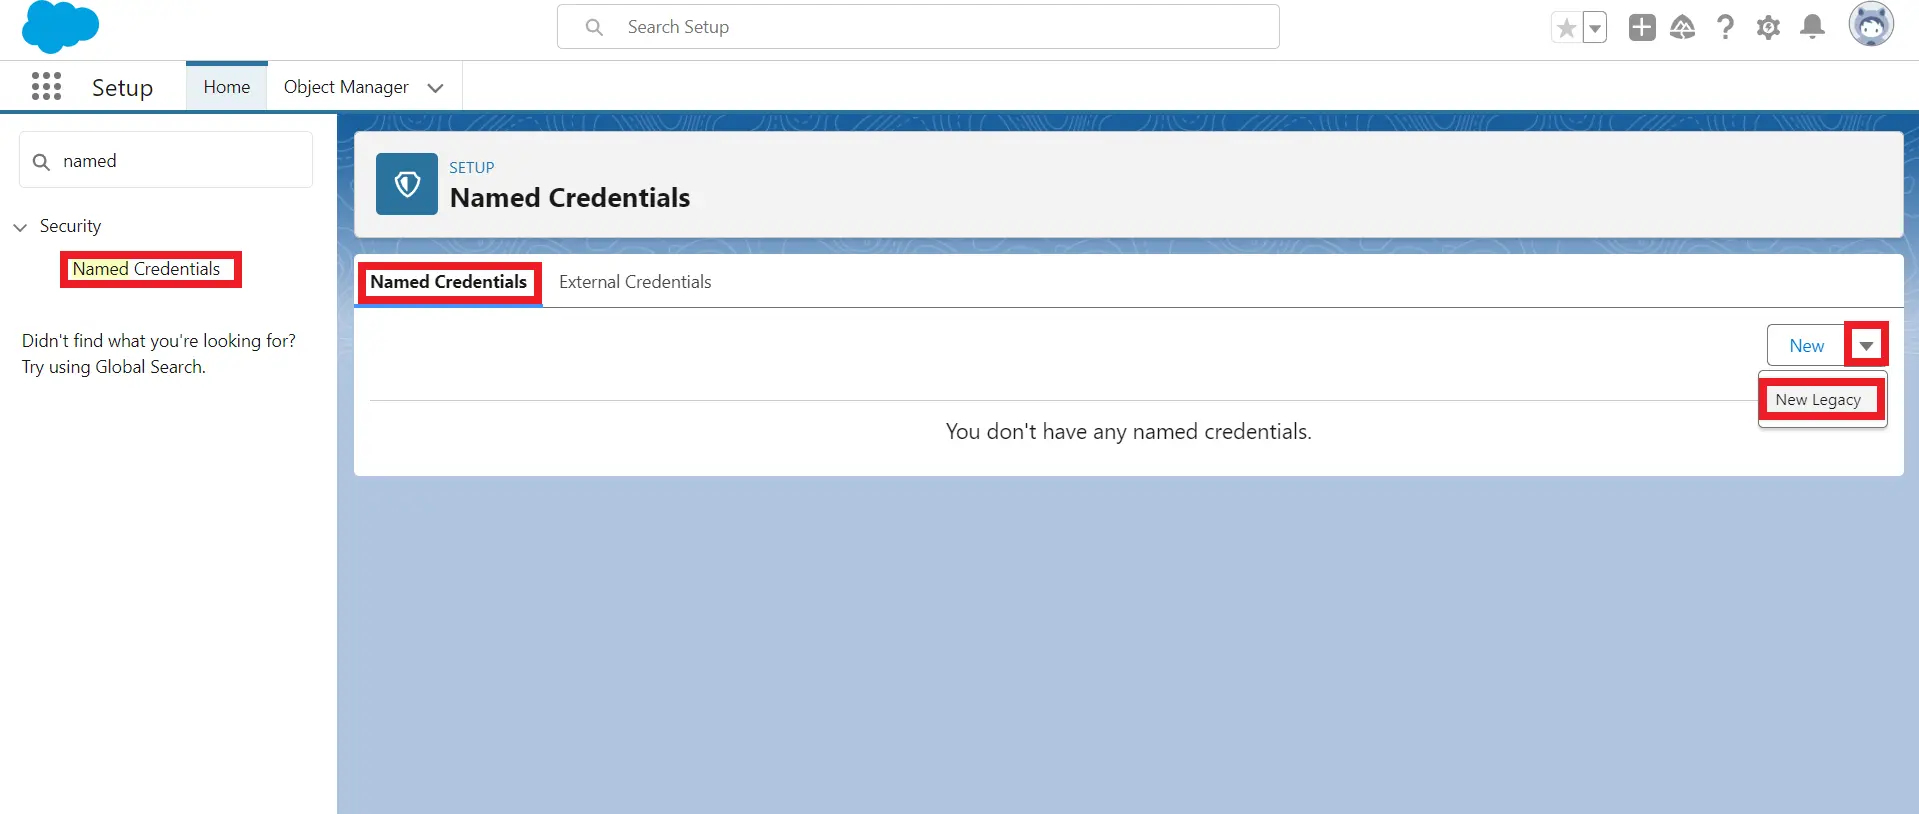
3. Fill in the below fields:
| Label | Xero |
| Name | Xero |
| URL | https://api.xero.com |
| Identity Type | Named Principal |
| Authentication Protocol | OAuth 2.0 |
| Authentication Provider | XeroAuthProvider |
| Scope | openid profile email accounting.transactions accounting.contacts |
Click Save.

4. Go to XeroAuthProvider in Auth. Provider and copy the Callback URL.
5. Go to the SalesforceConnect app in developer.xero.com > Configuration > In Redirect URIs, paste the Callback URL and click Save.
6. Go to Xero in Named Credentials and click on Edit > Save > Allow access for 30 minutes.
Create contacts in Xero using the API:
| Property | Description |
| EndPoint | https://api.xero.com/api.xro/2.0/Contacts |
| Method | POST |
| Description | Allows you to add contacts in a Xero organization |
Request:
            {
              "Name": "ABC Limited"
            }
Response:
            {
              "Id": "45123129-16c0-4eea-9c10-a645d2257ad3",
              "Status": "OK",
              "ProviderName": "API Explorer",
              "DateTimeUTC": "\/Date(1712849038602)\/",
              "Contacts": [
                {
                  "ContactID": "2f183a9d-e95e-4ce9-8b42-d37b37240268",
                  "ContactStatus": "ACTIVE",
                  "Name": "test Limited",
                  "EmailAddress": "",
                  "BankAccountDetails": "",
                  "Addresses": [
                    {
                      "AddressType": "STREET",
                      "City": "",
                      "Region": "",
                      "PostalCode": "",
                      "Country": ""
                    },
                    {
                      "AddressType": "POBOX",
                      "City": "",
                      "Region": "",
                      "PostalCode": "",
                      "Country": ""
                    }
                  ],
                  "Phones": [
                    {
                      "PhoneType": "DEFAULT",
                      "PhoneNumber": "",
                      "PhoneAreaCode": "",
                      "PhoneCountryCode": ""
                    },
                    {
                      "PhoneType": "DDI",
                      "PhoneNumber": "",
                      "PhoneAreaCode": "",
                      "PhoneCountryCode": ""
                    },
                    {
                      "PhoneType": "FAX",
                      "PhoneNumber": "",
                      "PhoneAreaCode": "",
                      "PhoneCountryCode": ""
                    },
                    {
                      "PhoneType": "MOBILE",
                      "PhoneNumber": "",
                      "PhoneAreaCode": "",
                      "PhoneCountryCode": ""
                    }
                  ],
                  "UpdatedDateUTC": "\/Date(1712849038557+0000)\/",
                  "ContactGroups": [],
                  "IsSupplier": false,
                  "IsCustomer": false,
                  "SalesTrackingCategories": [],
                  "PurchasesTrackingCategories": [],
                  "ContactPersons": [],
                  "HasValidationErrors": false
                }
              ]
            }
To create a contact record in Xero from salesforce, you need to create an apex trigger named ContactTrigger on contact and an apex class named IntegrationWithXero.
Modify the ContactTrigger file with the following code:
            trigger ContactTrigger on Contact (after insert) {

                for(Contact contactRecord : Trigger.New){
                    String fullName='';
                    if(contactRecord.FirstName !=null && contactRecord.LastName!=null)

                        fullName = contactRecord.FirstName+'
                '+contactRecord.LastName;
                    else if(contactRecord.LastName!=null)
                        fullName = contactRecord.LastName;
                    IntegrationWithXero.createContact(fullName);
                }
            }
Modify the IntegrationWithXero class with the following code:
                    public class IntegrationWithXero {
                        public static String tenantId;

                        public static void getTenantId() {
                            String endPoint='callout:Xero/connections';
                            Http http = new Http();
                            HttpRequest request = new HttpRequest();
                            request.setEndpoint(endPoint);
                            request.setMethod('GET');
                            request.setHeader('Content-Type', 'application/json');
                            HttpResponse response = http.send(request);
                            String jsonResponse = response.getBody();
                            JSON2Apex resultJson = new JSON2Apex();
                            List<JSON2Apex> result = resultJson.parse(jsonResponse);

                            tenantId = result[0].tenantId;
                        }

                        @Future(callout=true)
                        public static void createContact(String fullName) {
                            getTenantId();
                            String endPoint='callout:Xero/api.xro/2.0/Contacts';

                            Http http = new Http();
                            HttpRequest request = new HttpRequest();
                            request.setEndpoint(endPoint);
                            request.setMethod('POST');
                            request.setHeader('xero-tenant-id', tenantId);
                            request.setHeader('Accept', 'application/json');
                            request.setHeader('Content-Type', 'application/json');
                            request.setBody('{"Name": "'+fullName+'"}');
                            HttpResponse response = http.send(request);
                            Map<String, Object> responseObjMap =
                        (Map<String,Object>) JSON.deserializeUntyped(response.getBody());
                            SYstem.debug('responseObjMap >> '+responseObjMap);
                        }
                        public class JSON2Apex {
                            public String id;
                            public String authEventId;
                            public String tenantId;
                            public String tenantType;
                            public String tenantName;
                            public String createdDateUtc;
                            public String updatedDateUtc;

                            public List<JSON2Apex> parse(String json) {
                                return (List<JSON2Apex>)
                        System.JSON.deserialize(json, List<JSON2Apex>.class);
                            }
                        }
                    }
Get contacts in Salesforce using the API:
| Property | Description |
| EndPoint | https://api.xero.com/api.xro/2.0/Contacts |
| Method | GET |
| Description | Allows you to retrieve contacts in a Xero organization |
Response:
            {
              "Contacts": [
                {
                  "ContactID": "bd2270c3-8706-4c11-9cfb-000b551c3f51",
                  "ContactStatus": "ACTIVE",
                  "Name": "ABC Limited",
                  "FirstName": "Andrea",
                  "LastName": "Dutchess",
                  "CompanyNumber": "NumberBusiness1234",
                  "EmailAddress": "a.dutchess@abclimited.com",
                  "BankAccountDetails": "45465844",
                  "TaxNumber": "415465456454",
                  "AccountsReceivableTaxType": "INPUT2",
                  "AccountsPayableTaxType": "OUTPUT2",
                  "Addresses": [
                    {
                      "AddressType": "POBOX",
                      "AddressLine1": "P O Box 123",
                      "City": "Wellington",
                      "PostalCode": "6011",
                      "AttentionTo": "Andrea"
                    },{
                      "AddressType": "STREET"
                    }
                  ],
                  "Phones": [
                    {
                      "PhoneType": "DEFAULT",
                      "PhoneNumber": "1111111",
                      "PhoneAreaCode": "04",
                      "PhoneCountryCode": "64"
                    },{
                      "PhoneType": "FAX"
                    },{
                      "PhoneType": "MOBILE"
                    },{
                      "PhoneType": "DDI"
                    }
                  ],
                  "UpdatedDateUTC": "\/Date(1488391422280+0000)\/",
                  "IsSupplier": false,
                  "IsCustomer": true,
                  "DefaultCurrency": "NZD"
                },{
                  "ContactID": "6d42f03b-181f-43e3-93fb-2025c012de92"
                  ...
                }
              ]
            }
To get Xero contacts in salesforce, you need to create a method named getContacts in the IntegrationWithXero class.
Modify the getContacts method with the following code:
            public static void getContacts() {
                    getTenantId();
                    String endPoint='callout:Xero/api.xro/2.0/Contacts';

                    Http http = new Http();
                    HttpRequest request = new HttpRequest();
                    request.setEndpoint(endPoint);
                    request.setMethod('GET');
                    request.setHeader('xero-tenant-id', tenantId);
                    request.setHeader('Accept', 'application/json');
                    request.setHeader('Content-Type', 'application/json');
                    HttpResponse response = http.send(request);
                    Map<String, Object> responseObjMap = (Map<String,Object>)
                JSON.deserializeUntyped(response.getBody());
                    SYstem.debug('responseObjMap >> '+responseObjMap);
                }
To Test This API:
1. Open your salesforce org, search Contact in the app launcher, and select it.
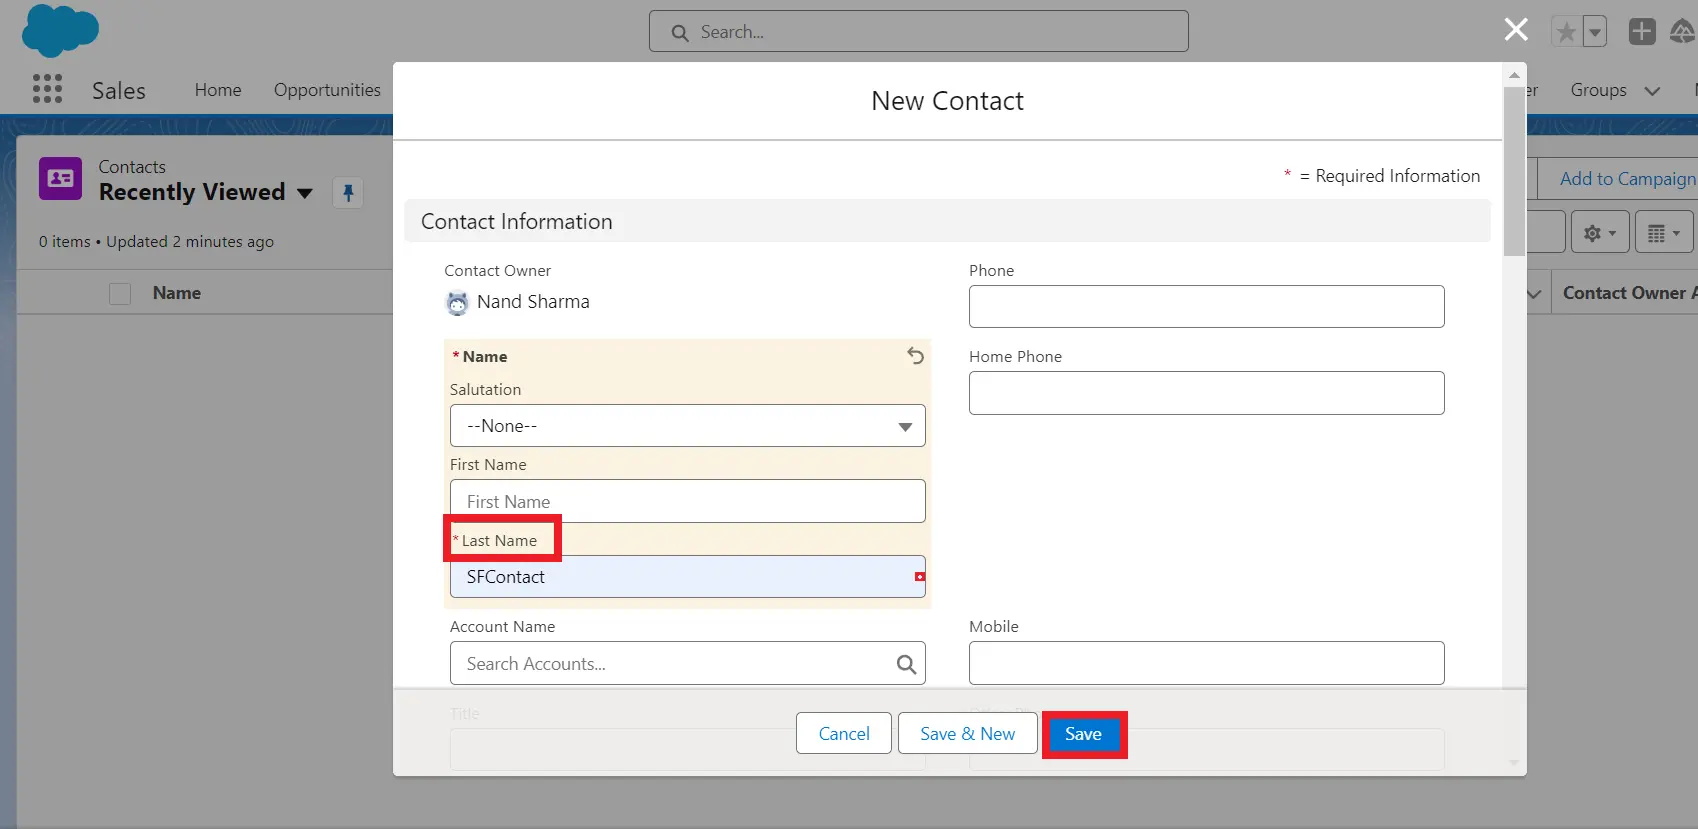
2. Click on New, and in LastName, enter SFContact.
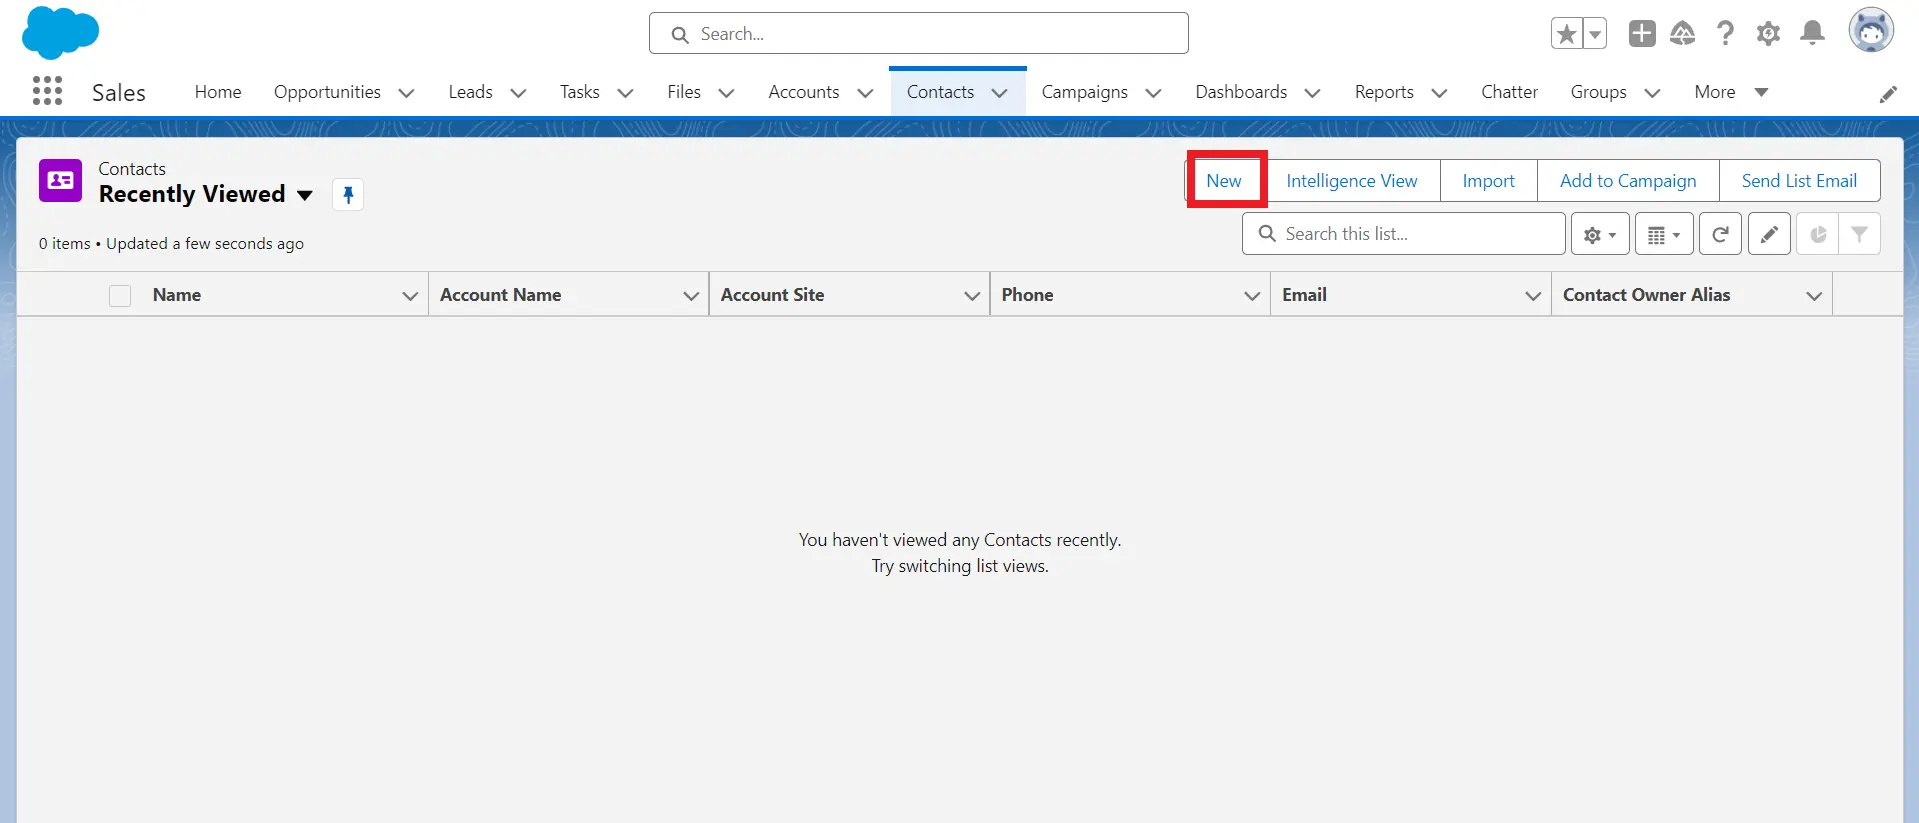
3. Click Save.
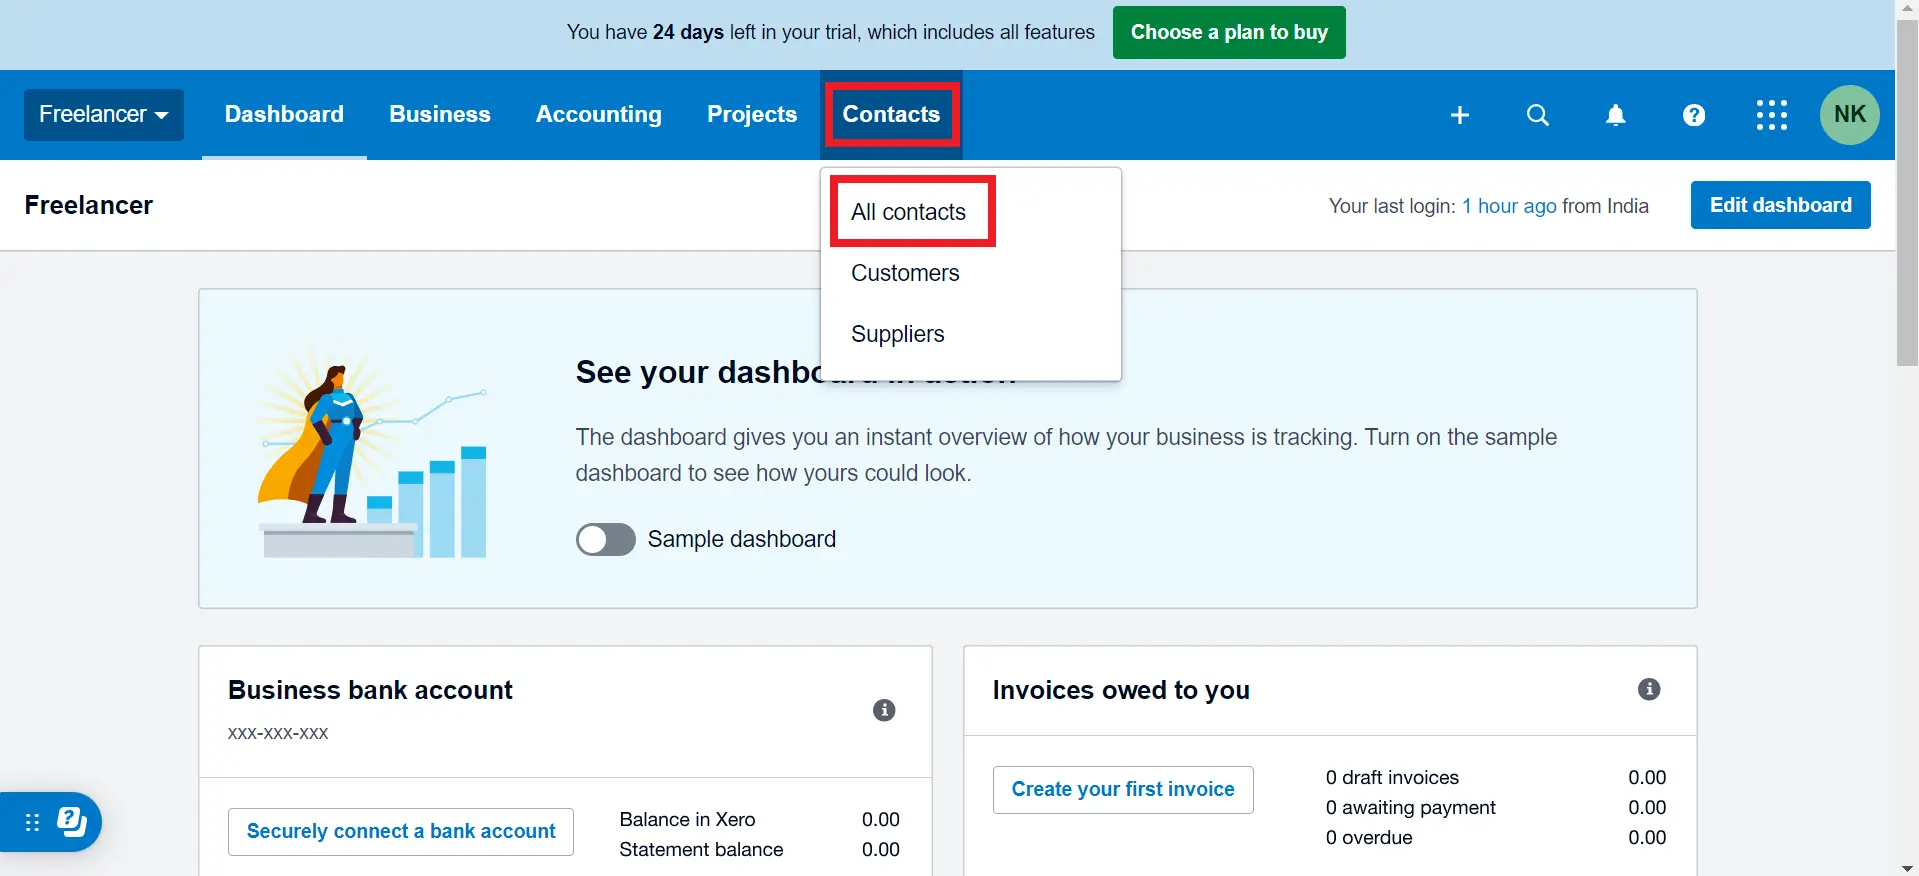
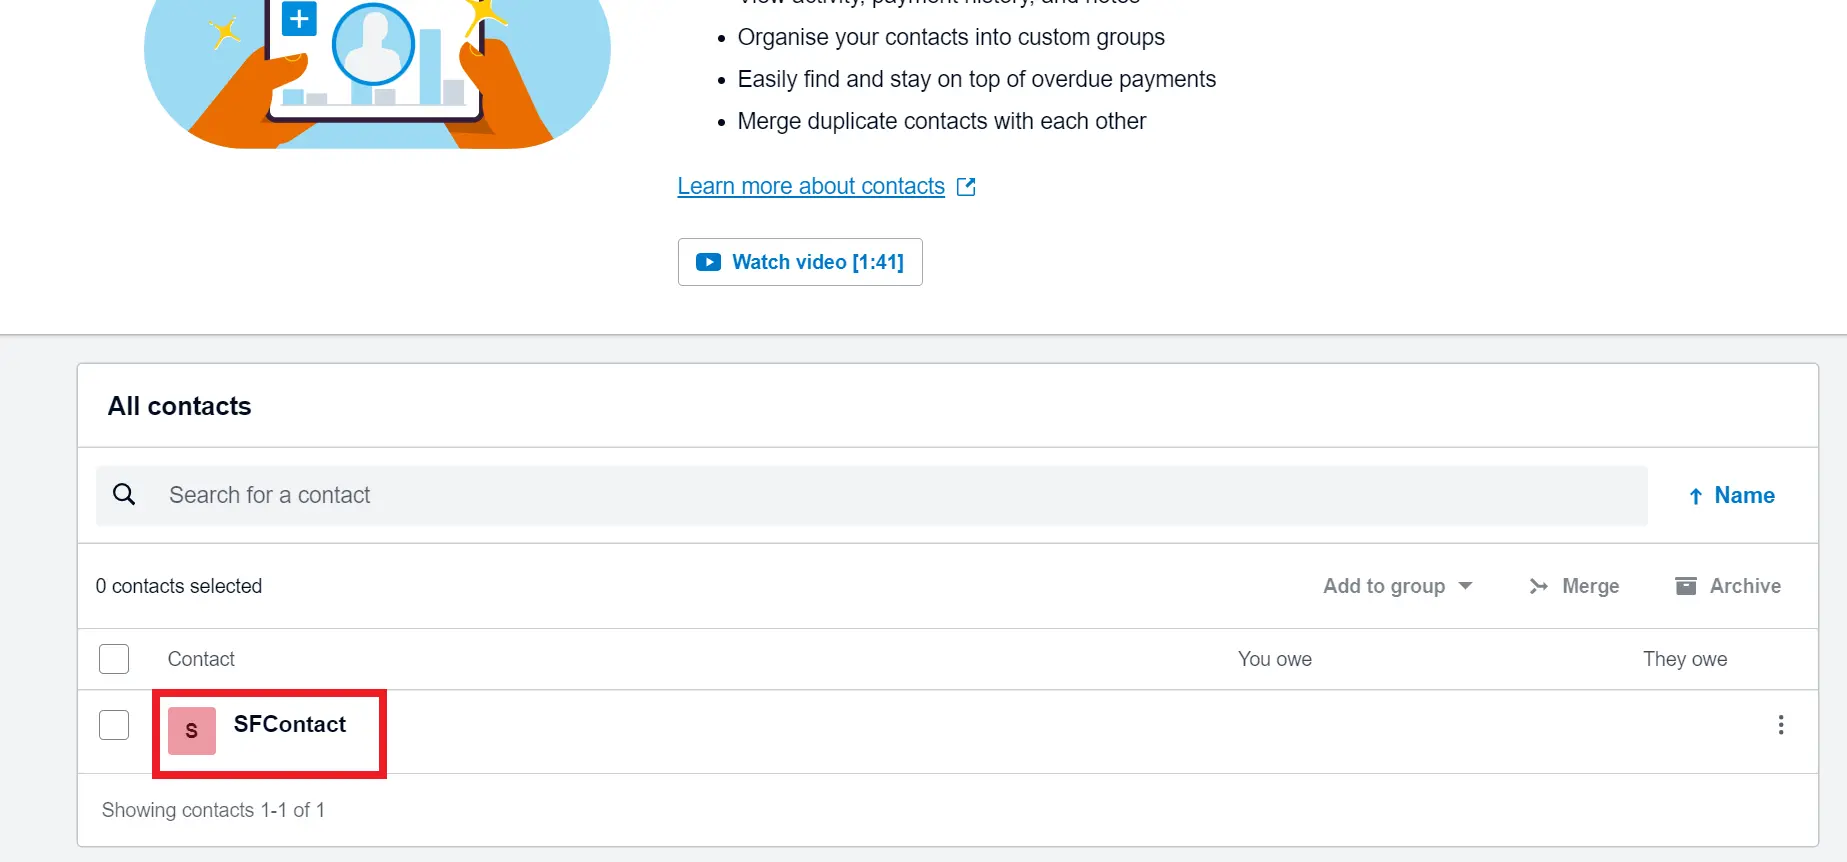
4. After a contact is created in Salesforce, the same contact record is created on the Xero account to check it. Open your Xero account, click on the contacts tab, select All Contacts, scroll down, and see that the contact has been created.
I hope this blog helped you!