Stripe Integration with Salesforce
April 9, 2024
After completing this unit, you will be able to:
- Introduction
- How to get a Secret key from Stripe?
-
Create a payment link using the REST API
Introduction:
In today's digital age, where e-commerce is booming and customer relationship management is paramount, integrating payment processing platforms like Stripe with CRM systems such as Salesforce can significantly streamline business operations. This integration not only enhances the efficiency of payment processing but also provides invaluable insights into customer behavior and transaction history. In this blog post, we'll explore the step-by-step process of integrating Stripe and Salesforce, unlocking a world of possibilities for businesses of all sizes.
Get the secret key:
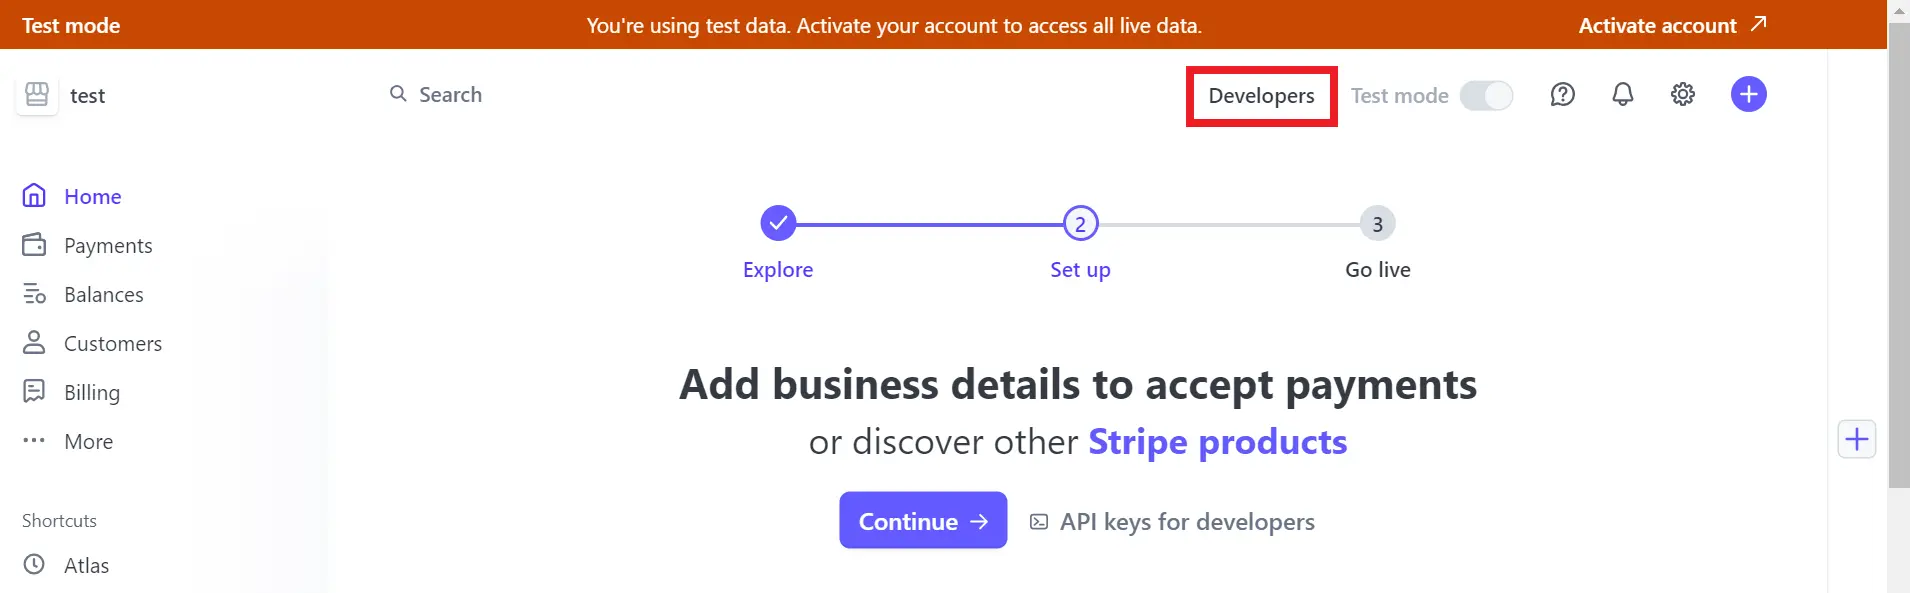
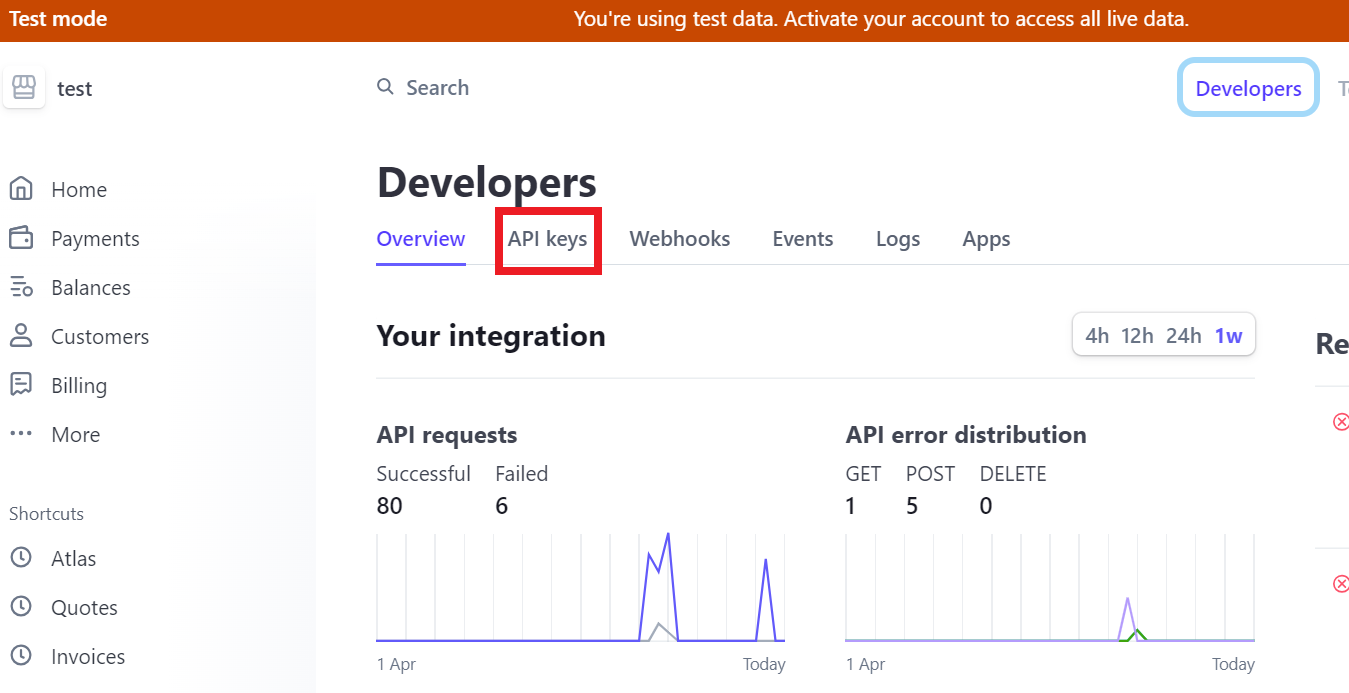
1. Firstly, you can log in to Stripe and then click on Developers > API Keys.
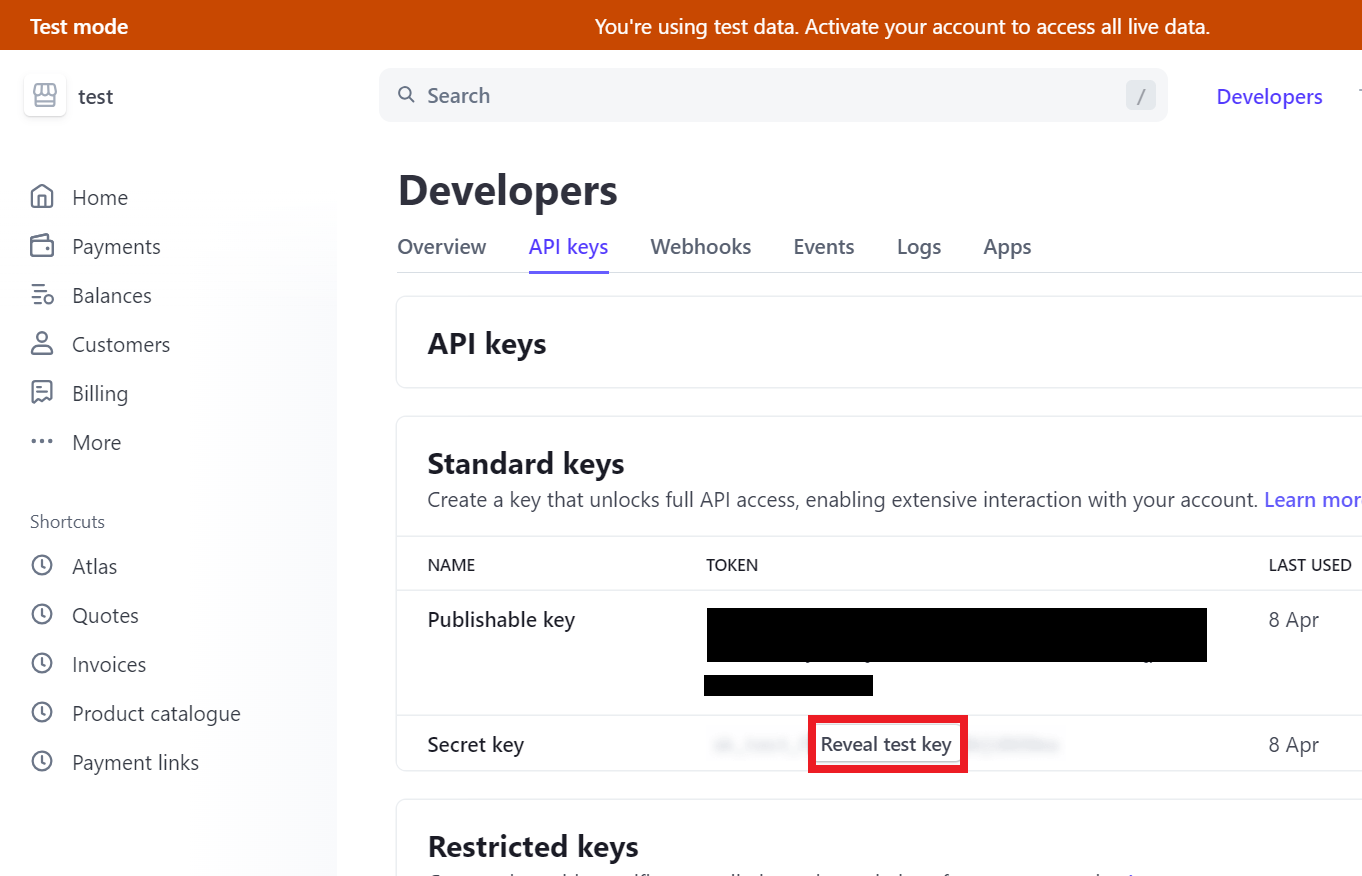
2. Under the Standard keys, click on the Reveal test key.
Create a payment link using the REST API:
Use the Stripe Dashboard to create a payment link that you can share with your customers. Stripe redirects customers who open this link to a Stripe-hosted payment page.
Base URL: https://api.stripe.com
EndPoint: https://api.stripe.com/v1/payment_links
Method: POST
Header Params:
|
line_items. |
required |
string |
example: price_1MoC3TLkdIwHu7ixcIbKelAC |
|
line_items. |
required |
string |
example: 1 |
RESPONSE:
                {
                  "id": "plink_1MoC3ULkdIwHu7ixZjtGpVl2",
                  "object": "payment_link",
                  "active": true,
                  "after_completion": {
                    "hosted_confirmation": {
                      "custom_message": null
                    },
                    "type": "hosted_confirmation"
                  },
                  "allow_promotion_codes": false,
                  "application_fee_amount": null,
                  "application_fee_percent": null,
                  "automatic_tax": {
                    "enabled": false,
                    "liability": null
                  },
                  "billing_address_collection": "auto",
                  "consent_collection": null,
                  "currency": "usd",
                  "custom_fields": [],
                  "custom_text": {
                    "shipping_address": null,
                    "submit": null
                  },
                  "customer_creation": "if_required",
                  "invoice_creation": {
                    "enabled": false,
                    "invoice_data": {
                      "account_tax_ids": null,
                      "custom_fields": null,
                      "description": null,
                      "footer": null,
                      "issuer": null,
                      "metadata": {},
                      "rendering_options": null
                    }
                  },
                  "livemode": false,
                  "metadata": {},
                  "on_behalf_of": null,
                  "payment_intent_data": null,
                  "payment_method_collection": "always",
                  "payment_method_types": null,
                  "phone_number_collection": {
                    "enabled": false
                  },
                  "shipping_address_collection": null,
                  "shipping_options": [],
                  "submit_type": "auto",
                  "subscription_data": {
                    "description": null,
                    "invoice_settings": {
                      "issuer": {
                        "type": "self"
                      }
                    },
                    "trial_period_days": null
                  },
                  "tax_id_collection": {
                    "enabled": false
                  },
                  "transfer_data": null,
                  "url": "https://buy.stripe.com/test_cN25nr0iZ7bUa7meUY"
                }
To begin, first of all, we need to create an apex class named IntegrationWithStripe and then a new Lightning Web Component named stripePaymentLink that will represent the custom button.
Create a Lightning Web Component:
1. To create a Lightning Web component, you need to open the VS code and authorize your org.
2. Press ctrl+shift+P, then enter the SFDX: Create Lightning Web Component command and select it.
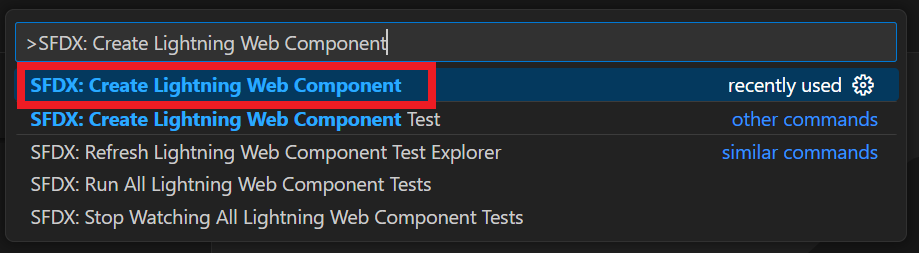
3. Type the component name stripePaymentLink and press Enter to accept the default force-app/main/default/lwc.


4. Now, your Lightning Web Component is created.
Create
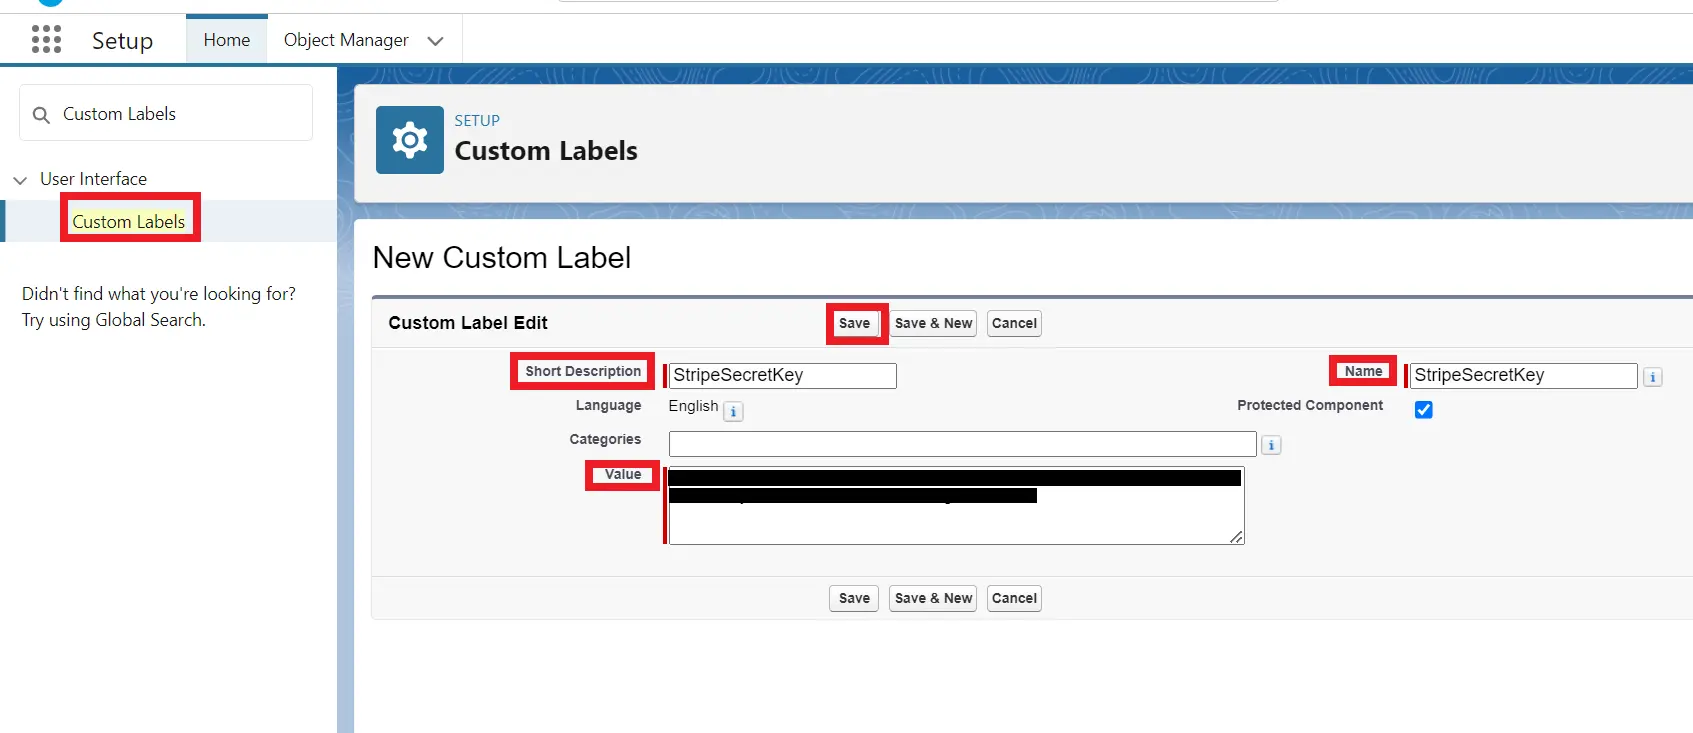
1. Go to Setup, search Custom Labels in the quick find box, and select it.
2. Click on the New Custom Label button and fill in these fields:
| Short Description | StripeSecretKey |
| Name | StripeSecretKey |
| Value | Paste your stripe secret key |
click Save.
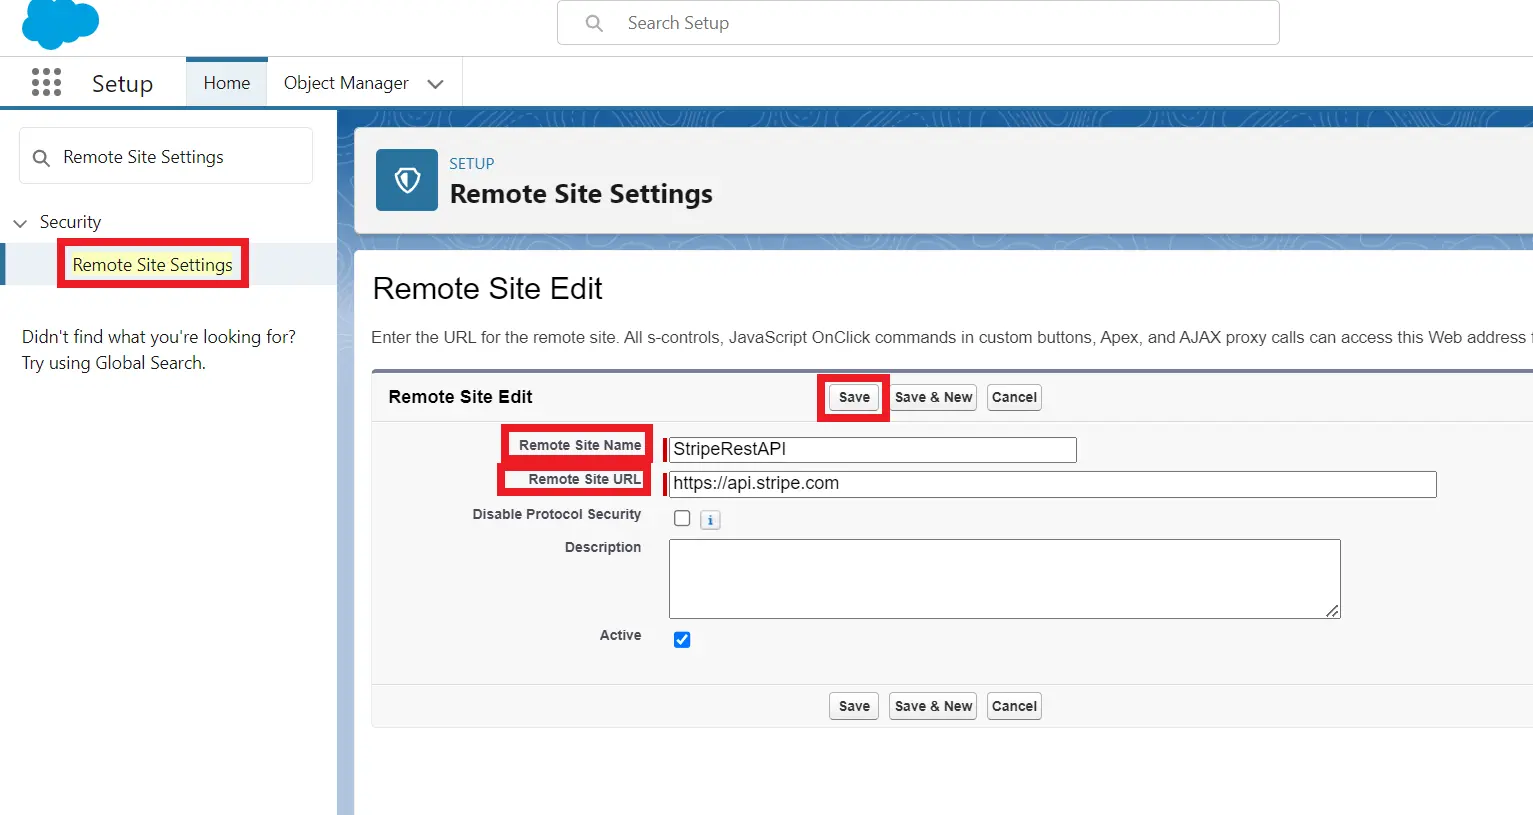
Create Remote Site Settings:
1. Go to Setup search Remote Site Settings in the quick find box and select it.
2. Click on the New Remote Site button and fill in these fields:
| Remote Site Name | StripeRestAPI |
| Remote Site URL | https://api.stripe.com |
click Save.
Modify the IntegrationWithStripe file with the following code:
public class IntegrationWithStripe {
public static String baseUrl = 'https://api.stripe.com';
@AuraEnabled(cacheable=true)
public static String createPaymentLink(Integer quantity) {
String token = Label.StripeSecretKey;
String endPoint=baseUrl+'/v1/payment_links';
String body =
'line_items[0][price]=price_1P7BZ9SFoGQX3Q5coxSWVel3&line_items[0][quantity]='+quantity;
Http http = new Http();
HttpRequest request = new HttpRequest();
request.setEndpoint(endPoint);
request.setMethod('POST');
request.setBody(body);
request.setHeader('Authorization', 'Bearer '+token);
request.setHeader('Content-Type', 'application/x-www-form-urlencoded');
HttpResponse response = http.send(request);
Map<String, Object> responseObjMap = (Map<String,Object>)
JSON.deserializeUntyped(response.getBody());
String paymentURL = String.valueOf(responseObjMap.get('url'));
System.debug('paymentURL: >> '+paymentURL);
sendEmail(paymentURL);
return 'Success';
}
public static void sendEmail(String paymentLinkURL){
String paymentLink = '';
if(paymentLinkURL != null && paymentLinkURL != '')
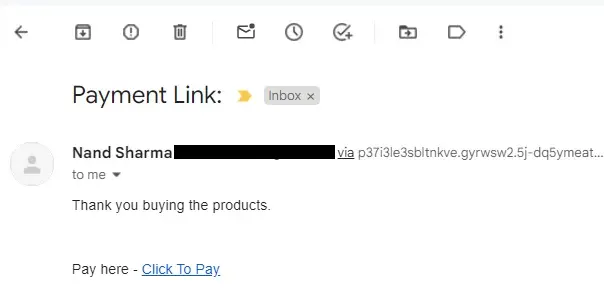
paymentLink = '<br/><br/>Pay here - <a
href="'+paymentLinkURL+'" target="_blank">Click To Pay</a>';
Messaging.SingleEmailMessage email = new Messaging.SingleEmailMessage();
string[] to = new string[] {'YOUR_EMAIL_ADDRESS'};
email.setToAddresses(to);
email.setSubject('Payment Link:');
email.setHtmlBody('Thank you buying the products.<br/>'+paymentLink);
Messaging.sendEmail(new Messaging.SingleEmailMessage[] { email });
}
}
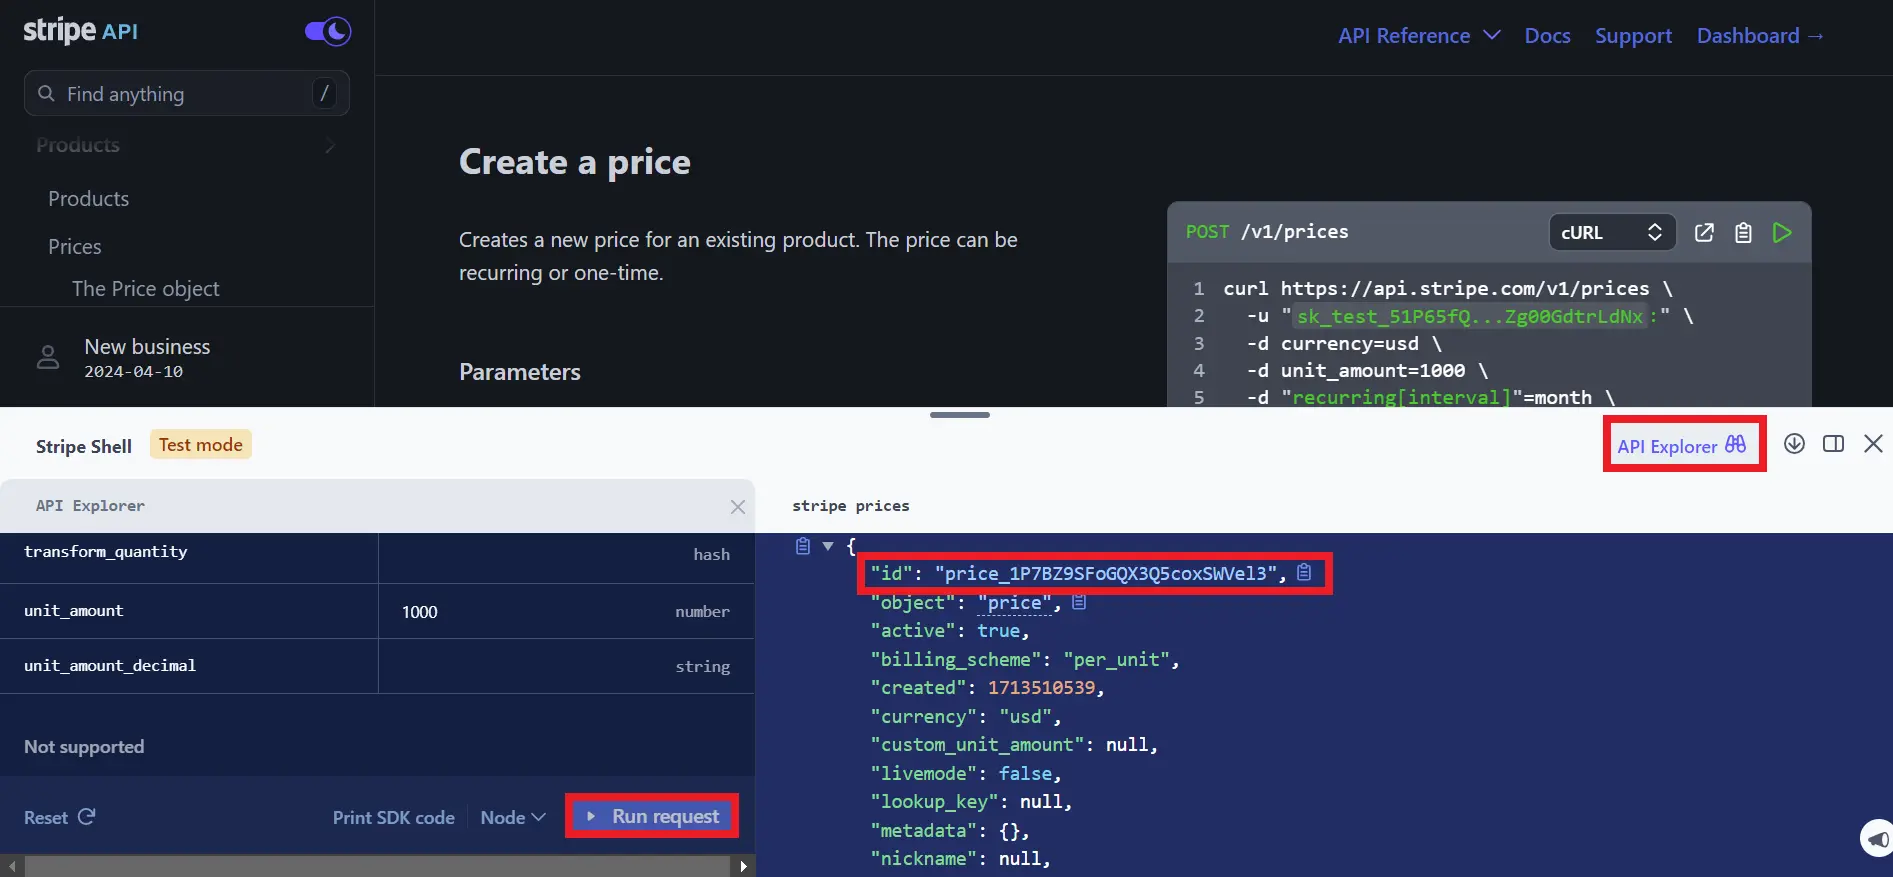
Note: In the upper code, price_1P7BZ9SFoGQX3Q5coxSWVel3 id in the body can expire. To create it, go to https://docs.stripe.com/api/prices/create.
Click on
 in the right down corner > API Explorer >
in Resource select Prices and
in Method select Create, then scroll down and fill
these fields:
in the right down corner > API Explorer >
in Resource select Prices and
in Method select Create, then scroll down and fill
these fields:
| Optional parameter | Value |
| product_data | Gold Plan |
| recurring | month |
| unit_amount | 1000 |
then click on Run request, copy the id, and paste it into the body.
Modify the stripePaymentLink.html file with the following markup:
        <template>
            <lightning-quick-action-panel header="Stripe Payment">
                <lightning-card>
                    <lightning-input type="number" label="Quantity"
            onchange={stripPaymentHandler}></lightning-input>
                    <div class="slds-align_absolute-center">
                        <lightning-button class="slds-p-top_small"
            label="Create Payment Link" variant="brand" onclick={createPaymentHandler}></lightning-button>

                    </div>
                </lightning-card>
            </lightning-quick-action-panel>
        </template>
In the stripePaymentLink.js file, add the following code:
        import { LightningElement } from 'lwc';
        import createPaymentLink from '@salesforce/apex/IntegrationWithStripe.createPaymentLink';
        import { CloseActionScreenEvent } from 'lightning/actions';
        import { ShowToastEvent } from 'lightning/platformShowToastEvent';

        export default class StripePaymentLink extends LightningElement {
            quantity;

            stripPaymentHandler(event) {
                this.quantity = event.target.value;
            }

            createPaymentHandler() {
                createPaymentLink({quantity: this.quantity})
                .then((response) => {
                    this.showToastMessage('Success', response, 'success');
                    this.handleClose();
                })
                .catch((error) => {
                    this.showToastMessage(error.statusText, error.body.message,
            'error');
                } )
            }

            showToastMessage(title, message, variant) {
                const evt = new ShowToastEvent({
                    title: title,
                    message: message,
                    variant: variant,
                    mode: 'dismissible'
                })
                this.dispatchEvent(evt);
            }

            handleClose() {
                this.dispatchEvent(new CloseActionScreenEvent());
            }
        }
            <?xml version="1.0" encoding="UTF-8"?>
            <LightningComponentBundle xmlns="http://soap.sforce.com/2006/04/metadata">
                <apiVersion>59.0</apiVersion>
                <isExposed>true</isExposed>
                <targets>
                    <target>lightning__RecordAction</target>
                </targets>
            </LightningComponentBundle>
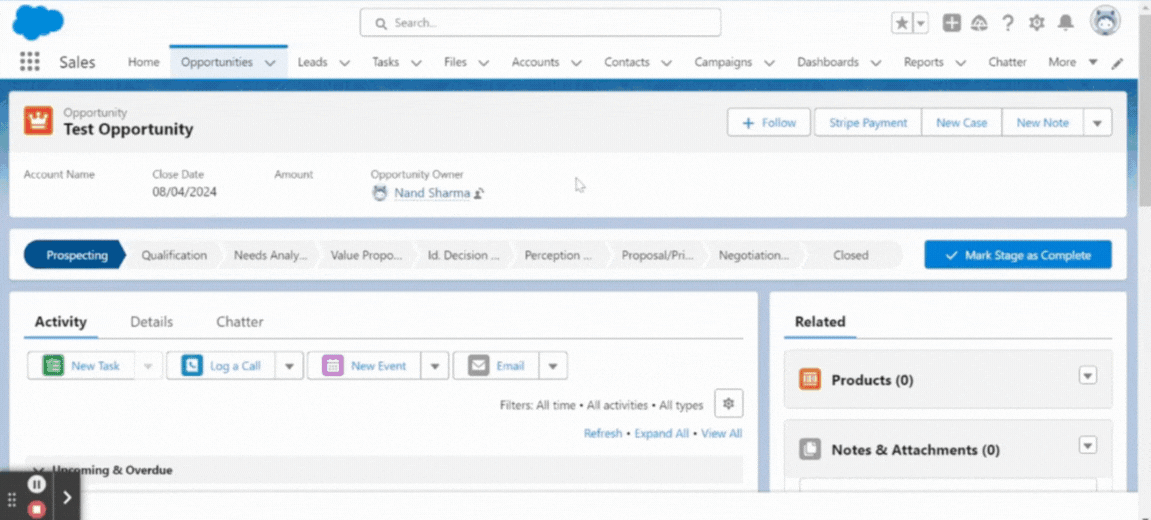
To Test This API:
1. Open your salesforce org and click on Object Manager > Opportunity > Buttons, Links, and Actions.
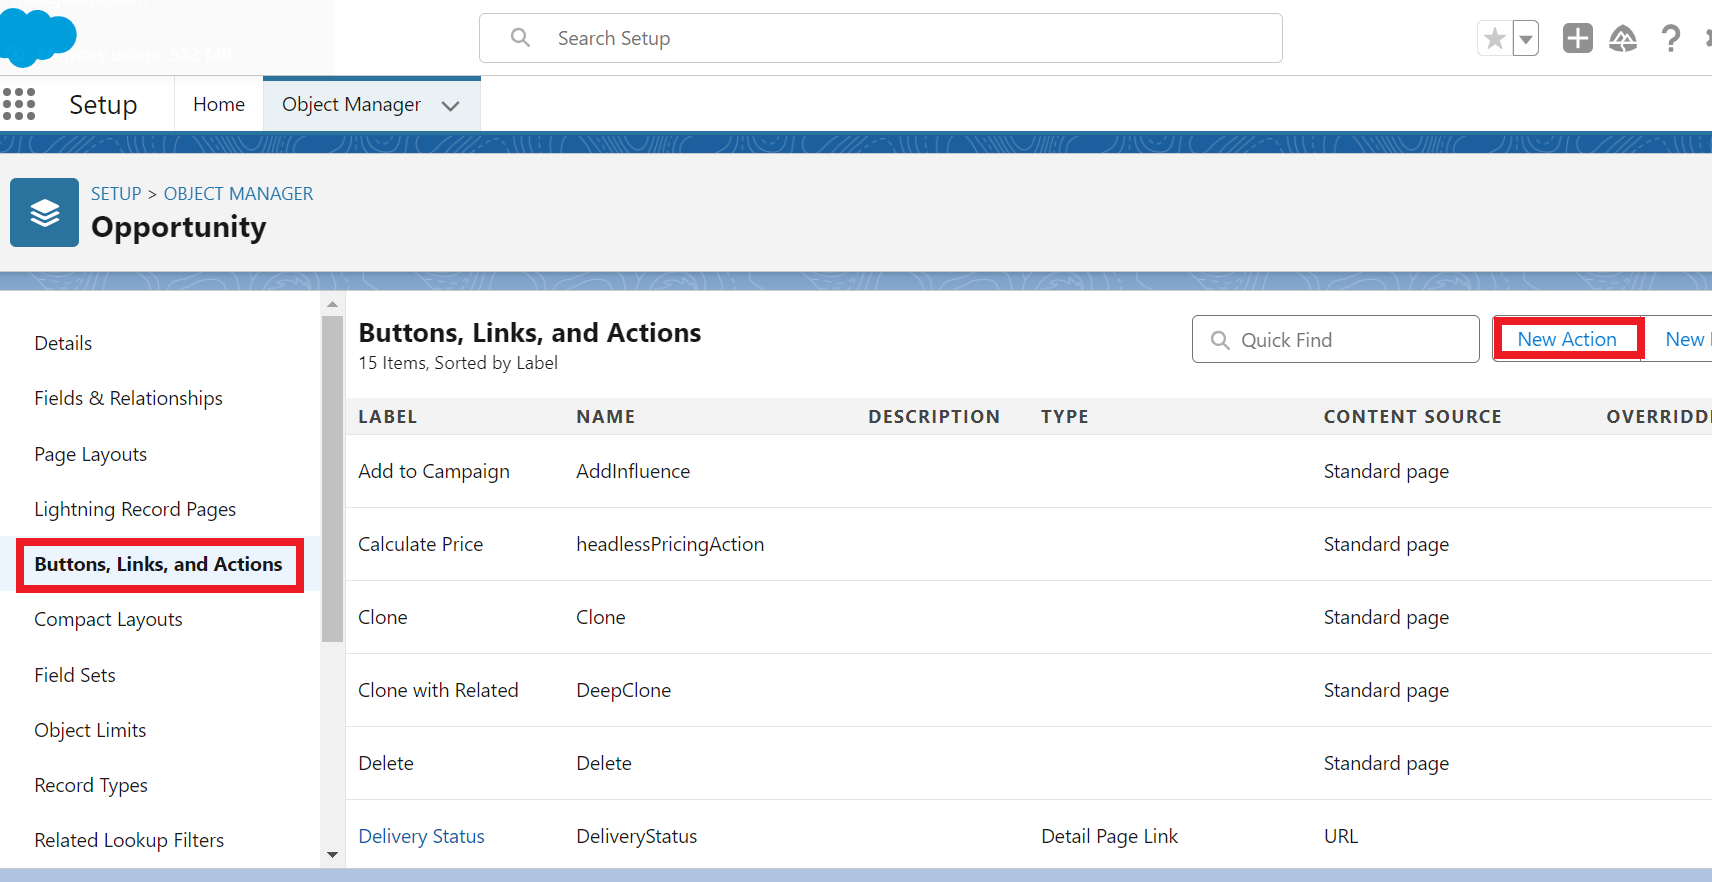
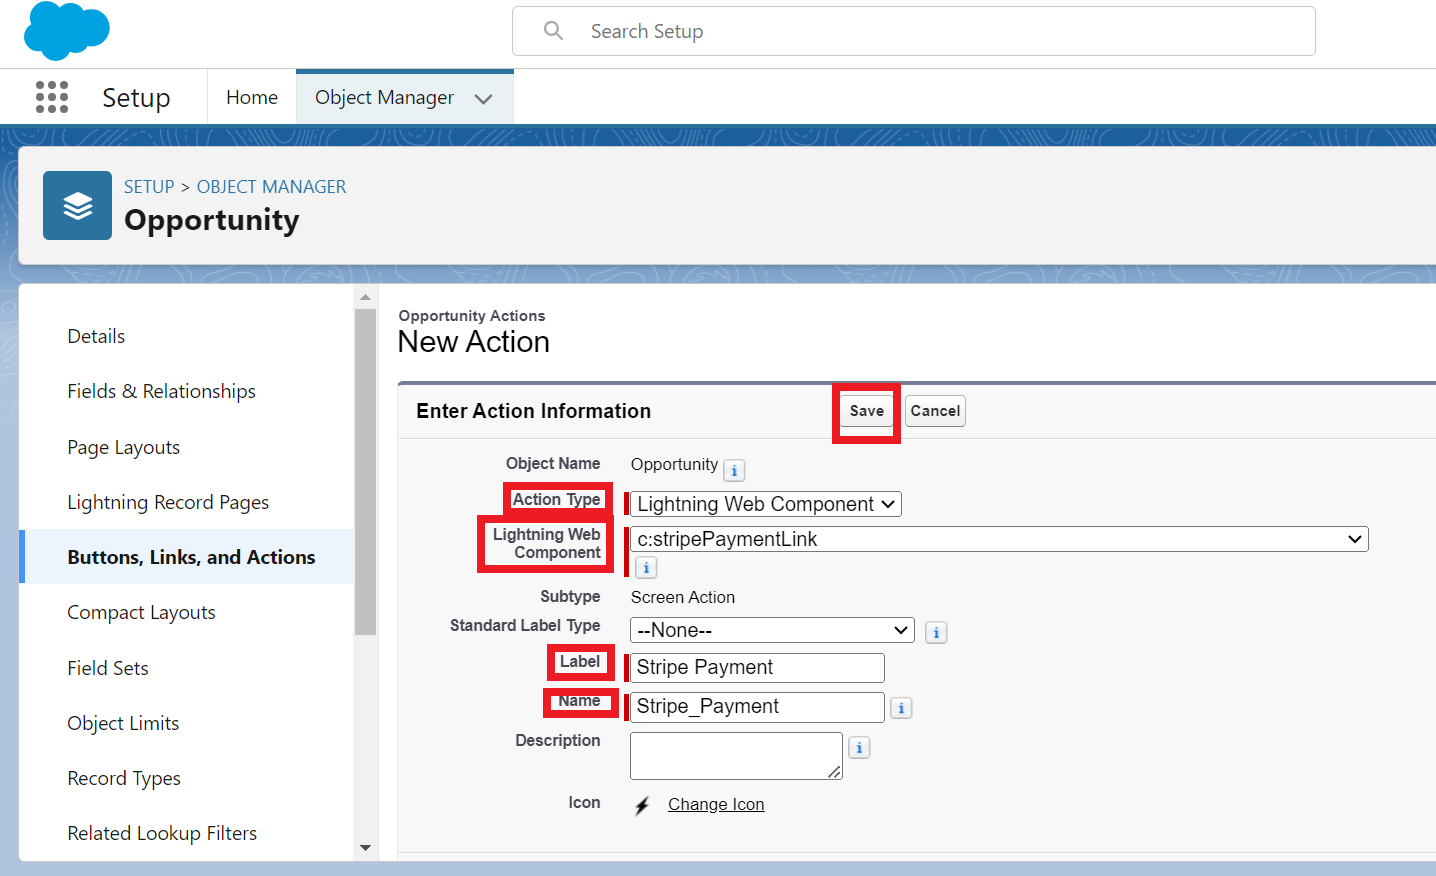
2. Click on the New Action button and fill these details:
| Action Type | Lightning Web Component |
| Target Object | c:stripePaymentLink |
| Label | Stripe Payment |
| Name | Stripe_Payment |
Click Save.
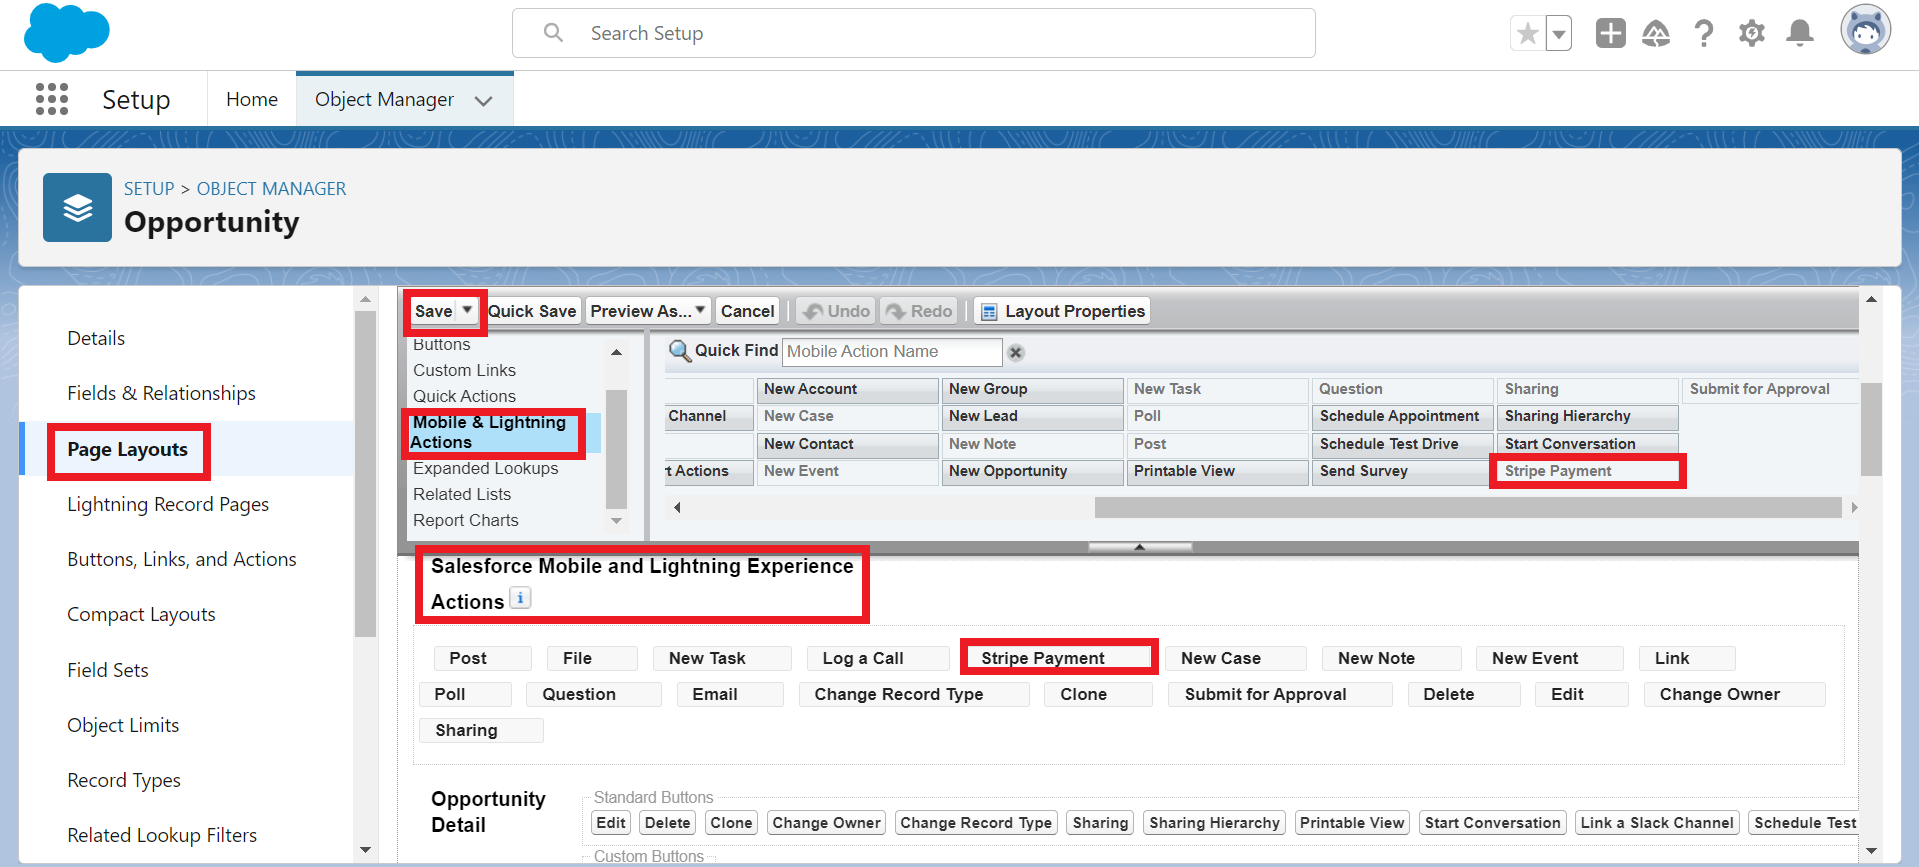
3. Click on Page Layouts > Opportunity Layout > Mobile & Lightning Actions > Drag Stripe Payment inside the Mobile and Lightning Experience Actions section and click Save.
4. Open the opportunity record and click on the Stripe Payment button.
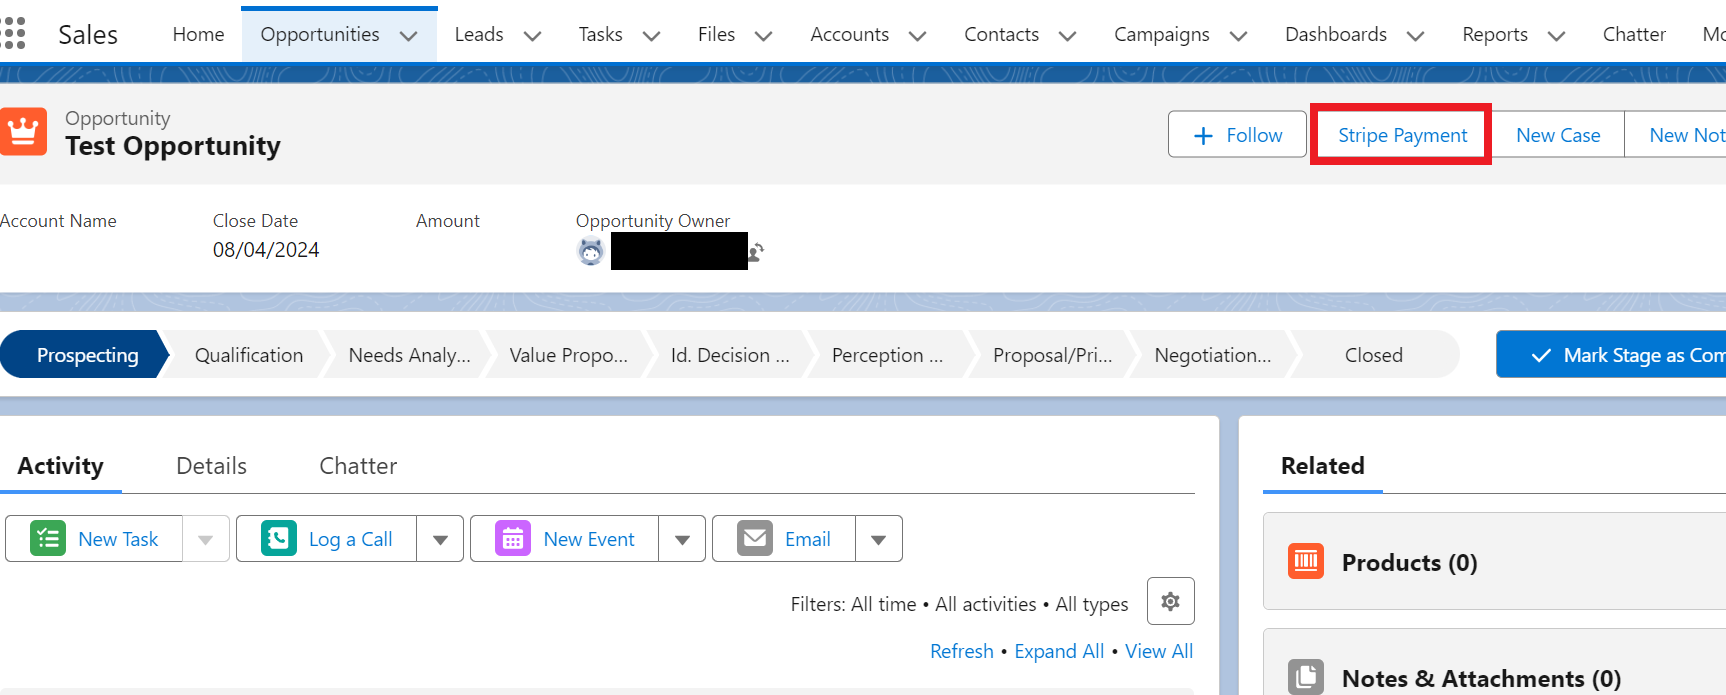
5. Enter the Quantity and click on the Create Payment Link button.
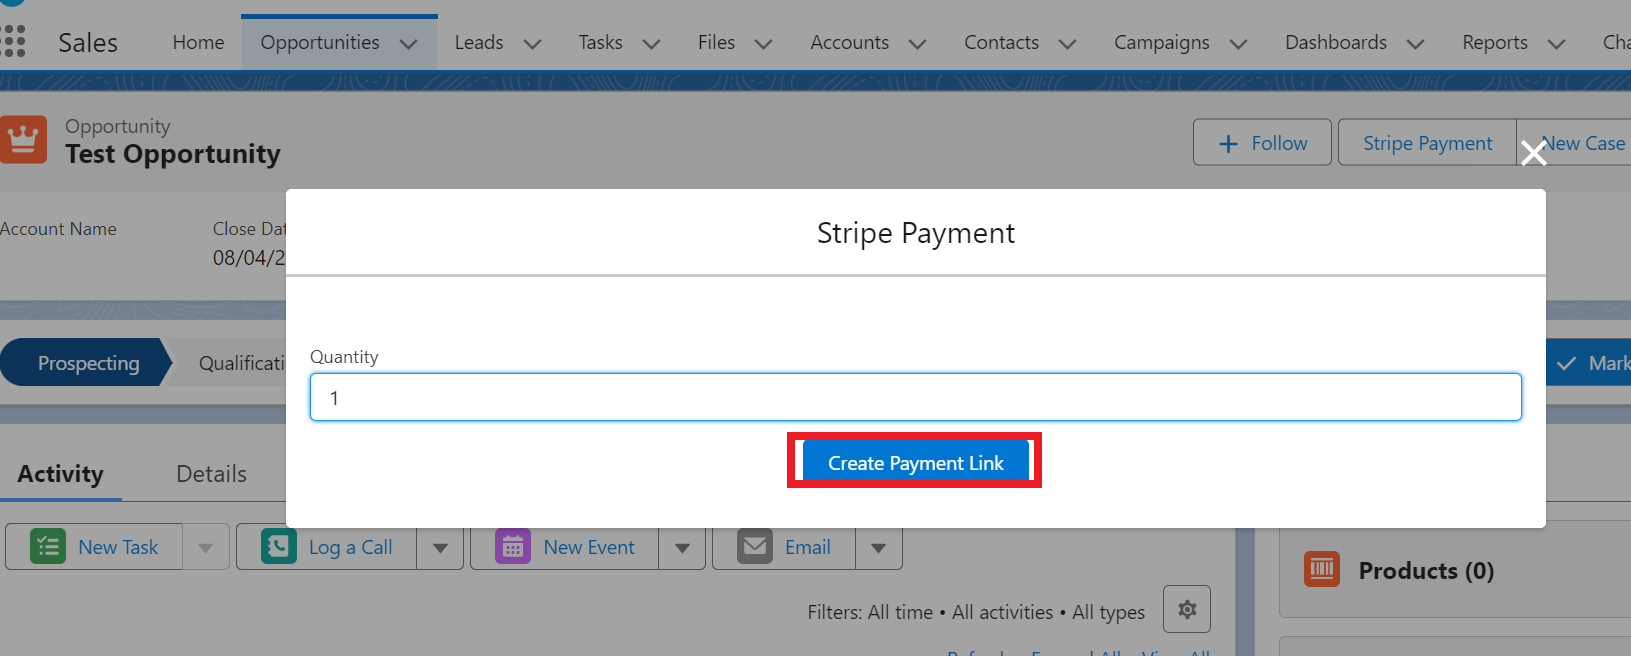
Now check your email.
I hope this blog helped you!