Setting Up Milestones in Salesforce for Effective Case Management
Oct 18, 2023
After completing this unit, you will able to:
1. Introduction
2. Before You Set Up Entitlements
3. Create an Entitlement
4. Using Entitlement Templates
5. Create a Milestone
6. Create an Entitlement Process
7. Add a Milestone to an Entitlement Process
8. Add a Milestone Action
9. Activate the Entitlement Process
10. Apply the Entitlement Process to an Entitlement
11. Create a Case Trigger for Entitlements
12. Create a Case from an Entitlement
13. Add the Milestone Tracker to Cases
1. Introduction
In today's fast-paced business landscape, exceptional customer service is non-negotiable. To meet and exceed customer expectations, organizations turn to Salesforce, a robust CRM platform known for its extensive suite of tools. One of the standout features that Salesforce offers is the Milestones functionality, which plays a crucial role in case management. In this blog post, we'll explore the concept of milestones in Salesforce and how they can be harnessed to optimize your case management processes.
In Salesforce, a milestone typically refers to a specific point in a process or journey, often associated with a record or case management. Milestones are commonly used in Salesforce Service Cloud to track and manage the progress of cases, such as customer support inquiries or service requests. They help in visualizing and monitoring the stages a case goes through to ensure timely resolution and customer satisfaction.
The major key points of Milestone:
Milestones are most commonly associated with case management. When a case is created, it may go through various milestones as it progresses towards resolution.
Milestones can be time-based, meaning they are tied to specific timeframes or deadlines. Salesforce can automatically track and update milestones based on preset time intervals or criteria, helping agents or teams stay on top of case progression.
Milestones are often represented graphically in Salesforce, such as progress bars or timeline views, making it easy for users to see the current status of a case.
Milestones can be automated using Salesforce Process Builder or Workflow Rules, allowing for automatic updates or notifications when milestones are reached or missed.
Salesforce administrators can customize milestones to align with their organization's specific case management processes. This may include defining different milestones, criteria for their completion, and associated actions.
Milestones play a significant role in reporting and analytics within Salesforce. Organizations can measure and analyze case resolution times, agent performance, and customer satisfaction by tracking milestones.
Actions can be associated with milestones, such as sending email notifications, changing case status, or updating case fields when a milestone is achieved.
2. Before You Set Up Entitlements
1. Enable Entitlements Management
a. In the Quick Find Box, enter Entitlement then click on the Entitlement Settings.
b. Select Enable Entitlement Management, and click on Save button.
2. Set Field-Level Security for Entitlement Name
a. In the Quick Find Box, enter Field Accessibility then click on the Field Accessibility.
b. Select Case object from the list and then select View by Fields.
c. Choose Entitlement Name from the picklist and then click on the Hidden next to the System Administrator profile.
d. You should able to see the Field-Level Security and Page Layout section, click on the Visible checkbox from both section.
3. Add Entitlement Templates to the Related List
a. From Object Manager tab, click on the Product object > Page Layouts > Product Layout.
b. Select the Related List then drag and drop the Entitlement Templates in the Related List section.
c. Click on the Save button.
4. Add the Entitlements related list to the Account and Asset object
a. From Object Manager tab, click on the Account object > Page Layouts > Account Layout > drag and drop the Entitlements to the Related List.
b. From Object Manager tab, click on the Asset object > Page Layouts > Asset Layout > drag and drop the Entitlements to the Related List.
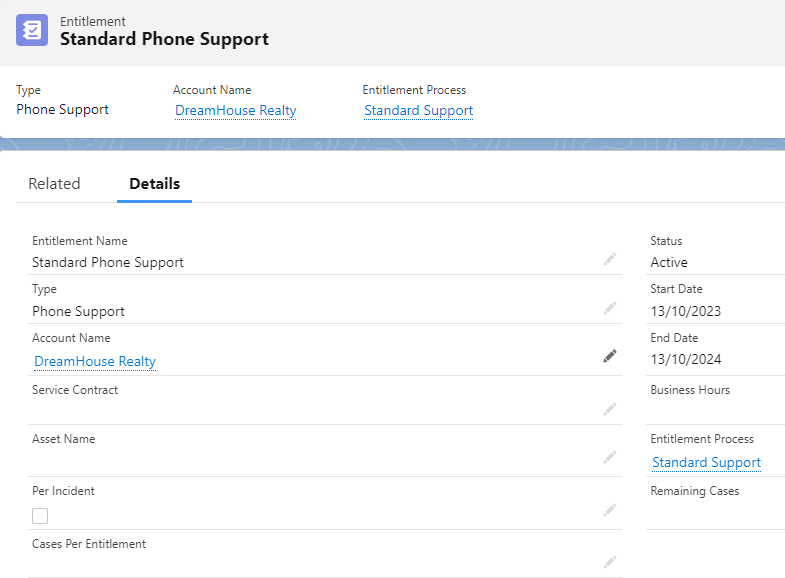
3. Create an Entitlement
To create an Entitlement record, select Entitlements from the App Launcher. Click on the New button and fill the information like the below figure:
Don't worry about the Entitlement Process field's value. We will create this in the next step.
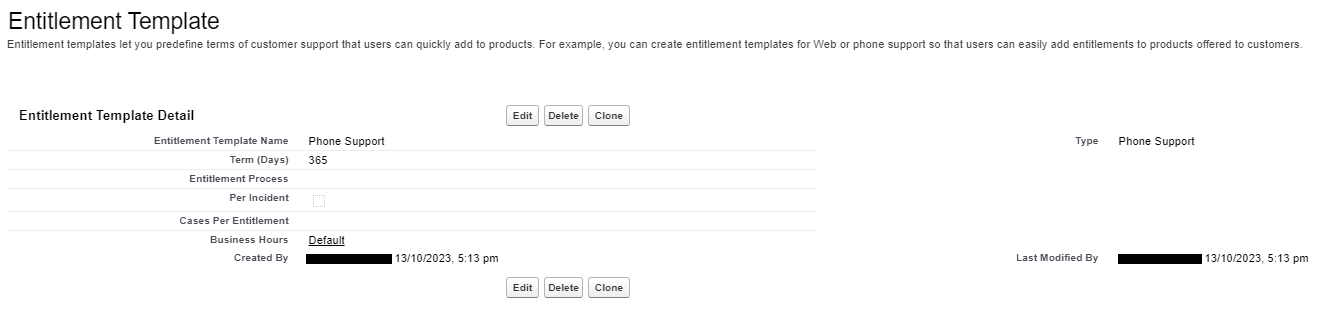
4. Using Entitlement Templates
To create Entitlement Templates, please follow the below steps:
1. In the Quick Find Box, enter Entitlement Templates then click on the Entitlement Templates.
2. Click on New button and fill the field information like the below figure:
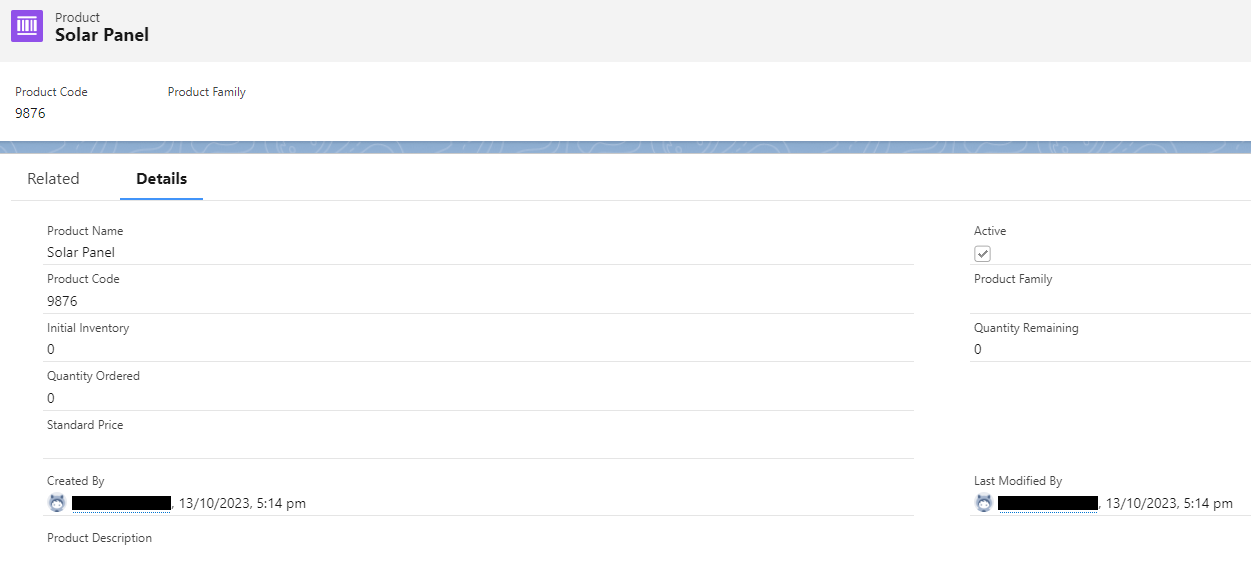
3. Now we need to create Product object record so let's create the record like the below figure:
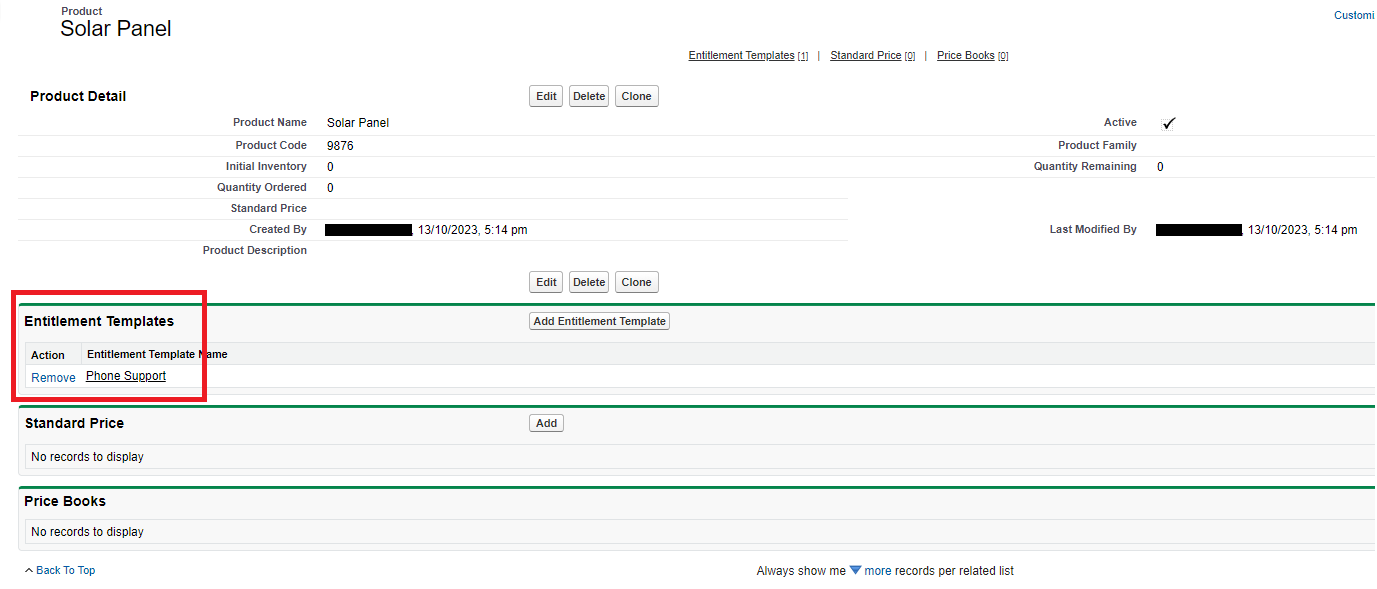
4. Add the Entitlement Template to the Product Record. To do this, we need to go to the Salesforce Classic and need to follow the below steps:
a. Open the Product record we just created.
b. Then click on the Add Entitlement Template button.
c. Select the Phone Support template we created in the above steps.
d. Click on Insert Selected then Done button. It should looks like this:
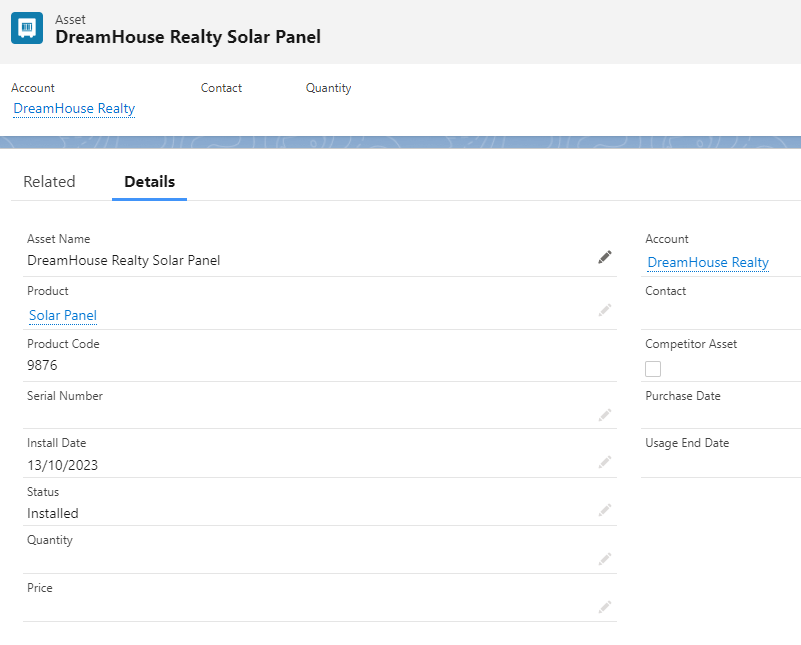
5. Create the Asset object record like the below figure:
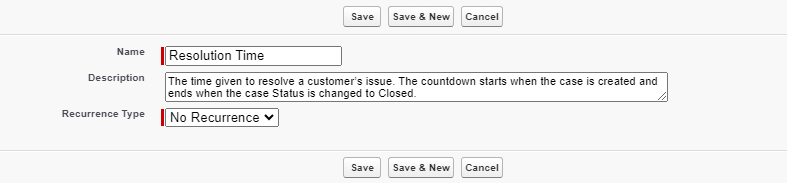
5. Create a Milestone
1. In the Quick Find Box, enter milestone then click on the Milestones.
2. Click on New Milestones button and fill the field information like the below figure:
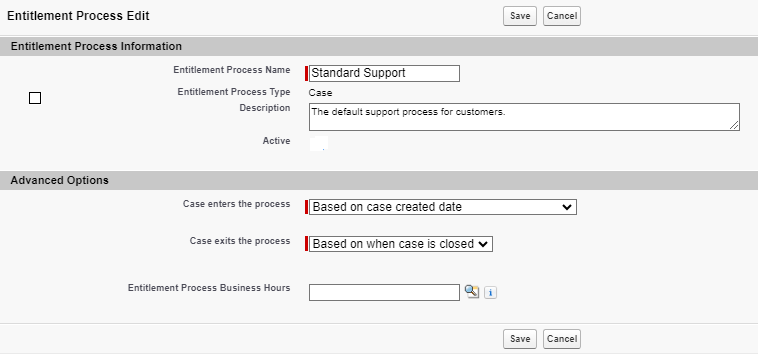
6. Create an Entitlement Process
1. In the Quick Find Box, enter entitlement processes then click on the Entitlement Processes.
2. Click on New Entitlement Processes button and fill the field information like the below figure:
7. Add a Milestone to an Entitlement Process
1. Open the Standard Support Entitlement Processes we created in the above steps.
2. Click on the New button nex to the Milestone section.
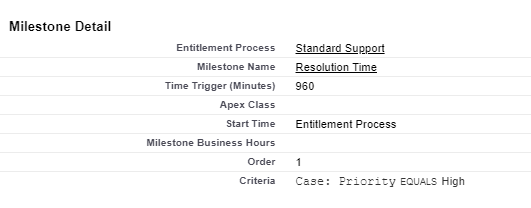
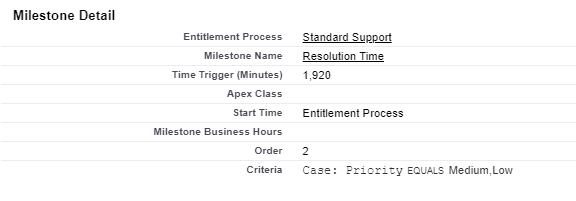
3. Now we create two milesotnes. First for the High Priority Case and Second for the Low Priority Case. (Choose the Resolution Time milestone from the picklist for both milestones like below figures:
For High Priority Case:
For Low Priority Case:
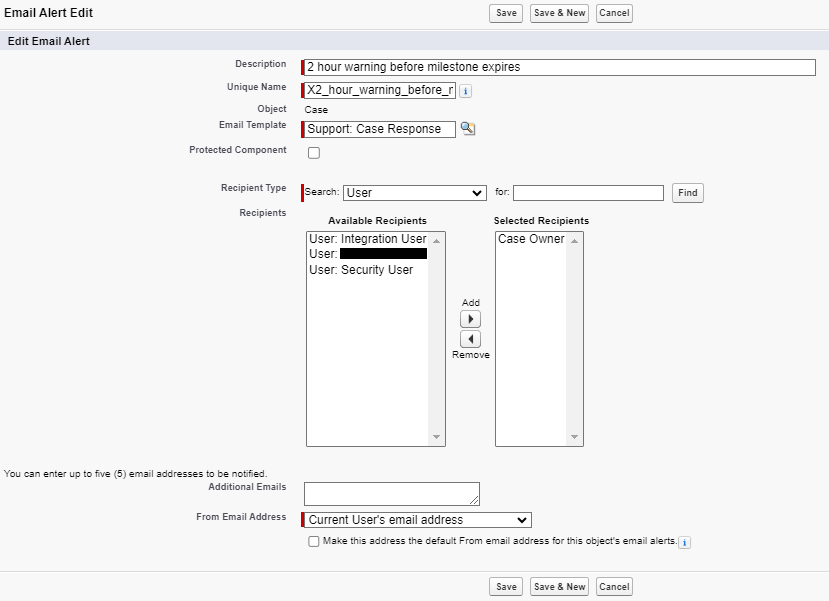
8. Add a Milestone Action
1. Open the Standard Support Entitlement Processes from Quick Find Box.
2. Open milestone for High Priority Case.
3. In the Warning Action section, click on the Add Time Trigger button.
4. Enter 2 and choose Hour so that the agents are notified before 2 hours of milestone expiration. Then click on the Save button.
5. Now you will able to see the Add Workflow Action button then click on the New Email Alert.
6. Fill the field information like the below figure:
9. Activate the Entitlement Process
1. Open the Standard Support Entitlement Processes from Quick Find Box.
2. Click on the edit button.
3. Select the Active and then Save button.
10. Apply the Entitlement Process to an Entitlement
1. Open the Standard Phone Support entitlement record from the App Launcher.
2. Edit the record with the Entitlement Process field and select the Standard Support prorcess.
3. Click on the Save button.
11. Create a Case Trigger for Entitlements
Let's create the trigger on the Case object so that the entitlements aren’t automatically added to new cases.
trigger DefaultEntitlement on Case (Before Insert, Before Update) {Set<Id> contactIds = new Set<Id>();Set<Id> acctIds = new Set<Id>();for (Case c : Trigger.new) {contactIds.add(c.ContactId);acctIds.add(c.AccountId);}List <EntitlementContact> entlContacts = [Select e.EntitlementId, e.ContactId, e.Entitlement.AssetId From EntitlementContact e Where e.ContactId in :contactIds And e.Entitlement.EndDate >= TodayAnd e.Entitlement.StartDate <= Today];if(entlContacts.isEmpty()==false){for(Case c : Trigger.new){if(c.EntitlementId == null && c.ContactId != null){for(EntitlementContact ec:entlContacts){if(ec.ContactId==c.ContactId){c.EntitlementId = ec.EntitlementId;if(c.AssetId==null && ec.Entitlement.AssetId!=null)c.AssetId=ec.Entitlement.AssetId;break;}}}}} else{List <Entitlement> entls = [Select e.StartDate, e.Id, e.EndDate,e.AccountId, e.AssetIdFrom Entitlement eWhere e.AccountId in :acctIds And e.EndDate >= TodayAnd e.StartDate <= Today];if(entls.isEmpty()==false){for(Case c : Trigger.new){if(c.EntitlementId == null && c.AccountId != null){for(Entitlement e:entls){if(e.AccountId==c.AccountId){c.EntitlementId = e.Id;if(c.AssetId==null && e.AssetId!=null)c.AssetId=e.AssetId;break;}}}}}}}
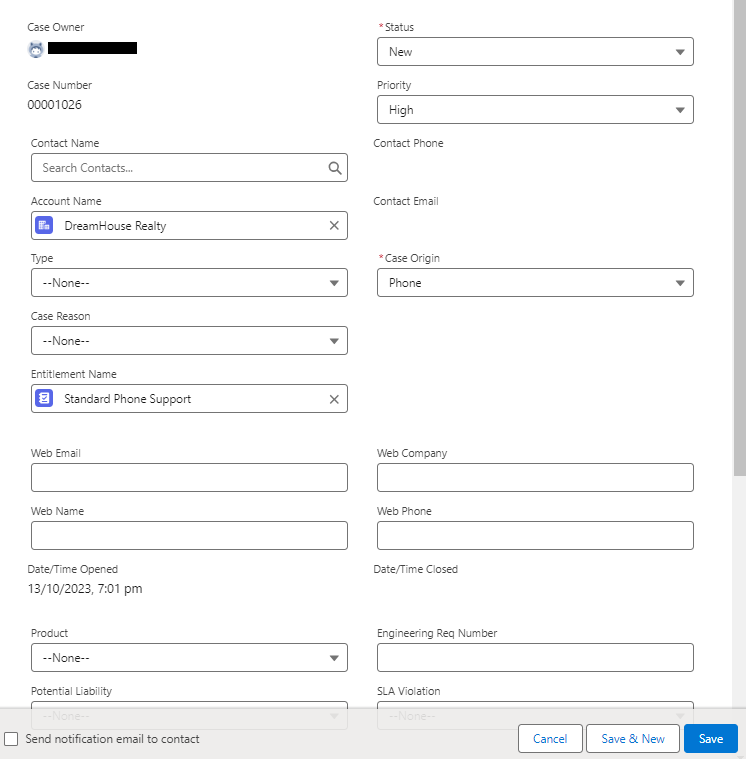
12. Create a Case from an Entitlement
Open the Standard Phone Support entitlement record from the App Launcher. Click on the Related tab then click on the new button to create new case record so that we can track the milestone on this case record.
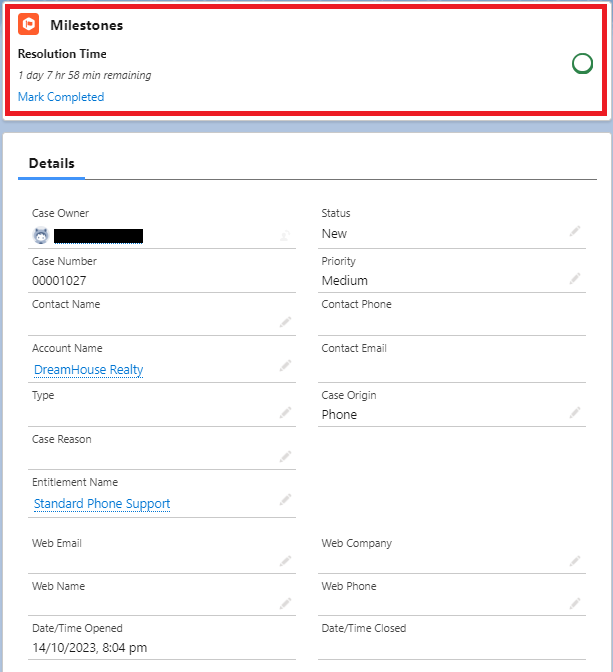
13. Add the Milestone Tracker to Cases
1. Open the case record we just created in the above step.
2. Click on the gear icon (at the top-right corner) and select the Edit Page.
3. Search for milestones from the Component tab at the top-left corner.
4. Drag and drop the Milestone component onto the case record detail page wherever you want.
5. Click on the Save button and activate the page. You will able to see like in the below figure:
By utilizing milestones in Salesforce, organizations can improve their case management and customer support processes, ensuring that cases are handled efficiently and in a timely manner, leading to higher customer satisfaction.